Showing posts with label Studio. Show all posts

Tuesday, September 17, 2019

PROFILE LIGHTING IN THE STUDIO


Because we have total control of lighting in the studio it is the best environment to create dramatic lighting. It’s all about direction of light and creating shadows. The fastest way to kill dramatic lighting is the use of a fill light.   That’s why I quit using any fill light in my studio over ten years ago. The most I use to soften shadows is a reflector—and even then I usually use a soft white; rarely do I use silver. 

One of the most dramatic lighting pattens used in the studio is Profile Lighting. In Profile Lighting even the reflector is not needed…
f13.0 @ 1/200 sec., ISO 200; Lens @ 105mm
Profile Lighting is a simple 3-Light setup:
  • The Main Light is at 90° relative to camera with the subject looking towards the light.
  • One grided background light (set @ f8.0)
  • One Hair light (set @ f11.0)
It’s simple in the number of lights used, but as usual, the placement and intensity of each light is critical in a successful outcome.

Here’s the original color studio image…
Original Color Image
Nowhere near as dramatic as my final Black and White image this was just my raw material to start with. In our film days this would have been our stopping point!

Processing the file:
  • I first opened it in NIK’s Silver Efex Pro 2, single image, Tone Mapping; Used Deep 2.
  • B&W conversion in NIK’s Silver Efex Pro 2 using their Fine Art preset-modified to my taste.
  • Noise reduction in NIK’s Define 2.
It’s remarkable how far we can take a digital file today to create our vision of a final image. However, it’s still important that we start with a good basic image; with highlights controlled and Light and Shadows where we want them.

As always, don’t hesitate to ask questions…’Til next week…

Author: Jerry W. Venz, PPA Master Photographer, Craftsman

Tuesday, July 30, 2019

STORYTELLING CHILDREN’S PORTRAITS IN THE STUDIO


Here at TheStorytellers in Meridian, Idaho, we try to do more than just a smile at the camera portrait that so many parents are trained to want.  Often a person’s personality is more apparent in their eyes than in their mouth. In addition, when many people smile broadly their eyes close-up and we lose that all important glimpse into what has been called “the window to the soul”…the eyes.

The hard part in our profession is getting our subjects to relax enough in front of our camera to really show us who they are. This is always more difficult in the studio and especially so with children!  I think this session went so well because these are returning happy clients. We have been doing their portraits since their daughter was an infant.  If the parents are nervous or anxious their children will pick-up on that energy. These parents trust us and are very comfortable bringing their children to us.

After we do some smiles the storytelling begins…
f11.0 @ 1/160 sec., ISO 200; Lens @ 140mm
I call this one the Future Executive Portrait!  Not many photographers would put a child into what we call a “power pose”, but this little guy fell into it like a pro. I like his intensity! That’s why I converted this to black and white.

Moving on to some literal storytelling…
 f11.0 @ 1/160 sec., ISO 200; Lens @ 102mm
We started doing family reading time when the daughter was a toddler, so it was a natural to do reading time showing their children enjoying this family tradition. You can tell they really enjoy doing this together. Some of the best storytelling is when NOBODY is looking at the camera!  

Moving on to the daughter….
f11.0 @ 1/160 sec., ISO 200; Lens @ 100mm
Their daughter is now a little more reserved in front of us, so we didn’t push her too much—and she did have a nice easy smile.  I converted this to black and white to show how it simplifies the image when you eliminate the bright colors.

And back to little brother…
f11.0 @ 1/160 sec., ISO 200; Lens @ 200mm
That impish smile tells it all! We took our time, didn’t rush anyone, and everybody had fun. We let our dog, Gadget, run around—she’s our studio mascot—and everybody loves our super friendly little dog!  

Have questions?  Don’t hesitate to ask…’Til next week…

Author: Jerry W. Venz, PPA Master Photographer, Craftsman

Tuesday, March 5, 2019

CELEBRATING WEIGHT LOSS WITH A PROFESSIONAL PORTRAIT!


We enjoy helping our clients celebrate their milestones. One of the common milestones is when they finally lose the weight they say they’ve always wanted to lose. I can’t tell you how many times I’ve had a potential customer say, “Oh, I know I need an updated portrait…but, I just have to lose a few pounds first—then I’ll call you!” Years go by and most never make that appointment. Sadly their procrastination sometimes means that they don’t commit to their own family portrait or even worse the large multi-generational group portraits (with their brothers and sisters families and the grand parents) that actually create the milestones of family history (“before it’s too late”).

Our solution to this procrastination—when the weight loss they seek is not so much—is to go ahead with the family portrait and have us trim them down with a little digital magic. Then they will have a preview (an image goal!) of the body they want. We do this kind of thing all the time.
And, somethings we get that call when the client finally achieves their goal….

f11.0 @ 1/200 sec., ISO 160; Lens @ 63mm
This is Ed, and he lost over 90 pounds and got really fit as well. So, when he told us he rewarded himself with that motorcycle we all agreed it had to be included to really personalize his portrait. And, besides look how comfortable Ed looks astride that Harley!

Here’s the big view….


This was the first large subject we photographed in our Eagle Studio. Doing a side view of a big bike was never possible in our previous studio, as our backgrounds at 10 feet wide were never wide enough. However, in the Eagle studio we were able to mount our 10x20’ backgrounds sideways giving us the 20 foot background needed to do this.

In addition we upgraded our studio lighting with a 7-foot Octodome (Photoflex) main light that will cover large objects or groups without the need for a fill light. By omitting the traditional fill light our lighting is more directional giving our images a nice three dimensional, dramatic, look.

That’s it for this week…as always should you have questions please don’t hesitate to ask…

Author:  Jerry W. Venz, PPA Master Photographer, Craftsman
Training site: http://www.LightAtTheEdge.com
Client site: http://www.TheStorytellersUsa.com

Tuesday, October 30, 2018

PROFESSIONAL STUDIO PHOTOGRAPHY—A BALLERINA


When doing photography of three-dimensional subjects, in the studio, it’s our job as professionals to use lighting that does not destroy that three-dimensionality. That means we must avoid Flat Lighting in most situations. One of the few exceptions I’ve encountered is in small product photography but, by and large, shadows should be created by our lighting set-up otherwise we just aren’t doing our job. I learned this the hard way and after 10-years of doing it like most other studio photographers did I discovered that I was simply using Too Many Lights! I was doing the usual Five or Six Light set-up and it just ended-up flashing all of the drama out of my images!  There were also Too Many Catch-Lights in my subjects eyes; it looked very unnatural. I learned that the offending culprit was using a studio Fill-Light; it flattened out my lighting ratio and created those secondary—ice pick like—catch lights in my subjects eyes. I, however, found that I couldn’t merely eliminate the fill light alone. It was demonstrated to me by Two Great photographers that I really respect, Will Crockett and Fred Hinegardner, that I also had to increase the Size of my Main Light significantly in order for the “wrapping effect” to eliminate the “need” of any type of fill.

So, I went from a typical 2 ft x 4 ft. Main Light to a 7-Foot OctoDome by Photoflex.

The results were stunning…
f13.0 @ 1/200 sec, ISO 200; Lens @ 70mm

There are only TWO Lights on my ballerina—the Main and the Hair Light; there are two lights on the background and that’s it.  I’m not even using a reflector.

Here’s my studio set-up for her…
Lighting Set-up
As you can see my large main light is placed to the side--just far enough so we maintain light in her far eye--creating a nice shadow on her face. The two background lights have grids and cine-foil shades to keep their light off my subject and ONLY on the background.

Here’s the only other Light in my set-up…

Hair Light
That 9”x24” strip light (also a soft box) does double duty here as the hair light and it puts highlights on her foot or hands when they’re above her head.

And Lighting from the opposite side…
Opposite side lighting
I’ve got my main light on Wheels so it’s easy to move to either side of the set.

Other advantages using a Large Soft Box:
  • Nice Large (round with mine) catchlights.
  • In close to subject wrapping effect with very soft shadows.
  • Pulled back (as shown) gives crisp details with pronounced shadows.
  • Covers large subjects or groups with ease.
Note on First Photo in the Blog:
The Lighting set-up in all these images is exactly the same. For the first photo I created a nice soft look in post by merely using Negative Clarity and Reduced Saturation.

That’s it for this week…Don’t hesitate to ask questions…

Author:  Jerry W. Venz, PPA Master Photographer, Craftsman
Training Site: http://www.LightAtTheEdge.com
Client Site: http://www.TheStorytellersUsa.com

Tuesday, June 5, 2018

LIGHT PAINTING A STILL LIFE: A KNIFE IN THE STUDIO; PART 2


Last week’s blog was about how I light painted two black pistols. That was challenging, but after I narrowed the light’s angle it was surprisingly easy because that modification gave me the precision needed to realize the old studio lighting maxim: “put light where you want it and don’t put light where you don’t want it”!

In this studio light paining blog I picked something more difficult—a very reflective knife. It’s a polished, stainless steel, dive knife that I paired with a vintage, stainless steel, Casio diver’s watch. To complete the set-up and enhance the dive theme I added a bunch of sea shells and a piece of white coral. Yeah, it’s complicated and a bit busy and after messing with the composition of all these elements I decided that the knife should be the center of interest because of its size and the powerful color of its handle. I had intended to make the watch the center of interest until I saw that it didn’t have the impact to lead in this set.

Here’s the final edited image….
f16.0 @ 30 sec., ISO 125; Lens @ 200mm

How I got the shot:


Lighting: In Part 1 I told you that I had to make a snoot (made of Cinefoil) for my flashlight to reduce the beam size for more accurate placement of highlights on my subjects. Well, because my subjects here are smaller and with all those tiny sea shells needing precise lighting I reduced the size of my snoot’s opening to about pencil size.

Painting:  You may be asking, “How did he get the blade of that knife without reflections from the flashlight?” that was my intent from the start—I wanted it to look almost black because I wanted the inscription on that, chrome like, polished blade to really stand out. 

So, when painting I swept my flashlight over the top edges of my set pieces (especially on the knife’s handle) without creating any forward angle that would front light the blade. Then I swept the light from each side working on all those shells.

Eliminating blade reflection:  You’ve probably heard the term, “angle of incidence equals angle of reflectance”, this just means that if the angle of your light matches your angle of observation you will see a reflection.

Family of Angles:  This refers to the Angles of view from a light source that a reflective surface will direct light back into the lens. For a flat surface the family of angles are the same as the lens’ angle of view—but coming back toward the camera.

The Solution:  Change your angle of view (lens focal length) so that the cone of light misses the lens.  So, I used a longer focal length (200mm) from a greater distance to reduce the family of angles (the cone of light). Now that the light is outside the family of angels light will not reflect back into the lens, thus eliminating direct reflections.

And that give me my dark blade!

The Background:  With so many more elements to paint I used up my 30 seconds on my subjects, so I had to do a separate exposure for the background.

f16.0 @ 30 se.c, ISO 125; Lens @ 200mm
Note on Color:  One of the problems when painting with an LED flashlight is that the LED light quality (its color temperature) can vary wildly between manufacturers. This is called its CRI—Color Rendering Index—which ideally should be 100 or 5500°K, the color temperature of daylight. Most LED flashlights are not even close to a CRI of 100 (I often saw a very blue shift in color in my painted set-ups using cheap LED flashlights) and most sellers or manufacturers won’t even tell you in the specs anything about its CRI! When I did find some LED flashlights with color temperatures at 5500°K (CRI100) they were really expensive ($100 to $350) and there was little variety in configuration compared to the cheap LED lights—such as multi-LED wands and such.

My Solution for Color: I simply started doing a custom white balance for each LED light. You just light paint a grey card exactly the same as painting your subject (same exposure) and you’re done.

That’s it for this week.  On to something new for next week… “Til then…

If you would like to check out the video I did on Light Painting go to: https://www.youtube.com/watch?v=oPng2IwX6Zg&t=20s

Author: Jerry W. Venz, PPA Master Photographer, Craftsman
Training Site: http://www.LightAtTheEdge.com
Client Site: http://www.TheStorytellersUsa.com

Tuesday, May 29, 2018

LIGHT PAINTING A STILL LIFE; GUNS IN THE STUDIO; PART 1


With over 30 years in the photography business it’s still sobering to discover that there are still things in this art/science to learn.

It’s interesting that this discovery seems to happen the most in studio photography—where we have control of ALL the variables. This just means that there are more things for us to screw-up on when we choose among the myriad of decisions that go into the photography of any subject! Just some of those decisions include: size of the light(s), type of lights, placement relative to subject and to each other, how to light the background, how to control each light source—volumes have been written about just these variables.

So, with decades of experience, education from some of the legends in photography, having earned my P.P.A. (Professional Photographers of America)  Masters and Craftsman’s degrees for International print competitions and teaching, I had approached the incredibly simple concept of light painting as beneath my involvement.  After all this experience and training I’m about to abandon my huge multi-thousand dollar investment in studio equipment….for a flashlight! 

The concept of light painting is so simple and yet like most art it’s all in the execution.  I’m reminded of what one sage photographer wrote decades ago…”it’s simple, you just put light where you want it and don’t put light where you don’t want it.” Simple!

So, here’s my second attempt at light painting….
f16.0 @ 30sec., ISO 125; Lens @ 168mm
Making it even harder this time I chose Two Black Pistols! Hey, it’s more interesting compositionally with two guns and by using two I can show both sides at the same time.


Even though the lighting is literally in-my-hands, now, all the standard lighting rules still apply, to wit:
  • Black objects (just like glass objects) are defined by their specular highlights.
  • Those specular highlights are created with the light source(s) striking the subject from the top and/or the sides—the light source never comes from camera position (that would create flat light).

What is very different about light painting is the precision that can be obtained in putting light exactly where you want it.  Because we mostly use large light sources in studio flash photography especially in portraiture—pin point precision is not needed.

When painting these guns I found that my little LED flashlight’s beam was too large and I over lit the muslin material around the gun in front. I carefully tried to just paint the gun.

Here is the set-up and my lighting solution….
The set-up

I did two things….I reduced the size of my beam (I made a snoot out of good-‘ol Cinefoil) and I brought the flashlight in closer to my subjects.


I’m happy with the final result and I did it all within my 30 second exposure (including the background).

In Part 2 I’ll continue with a more difficult subject set-up using a knife and some small support objects.

’Til next week….

Author:  Jerry W. Venz, PPA Master Photographer, Craftsman
Training site: http://www.LightAtTheEdge.com
Client site: http://www.TheStorytellersUsa.com

Tuesday, March 6, 2018

STUDIO PHOTOGRAPHY OF REFLECTIVE OBJECTS


If you’re looking for a quick, easy, method to photograph reflective subjects then look up tutorials using a light tent or cube because you’re not going to find it here. As a full time professional with over thirty years of studio experience I’ve never done studio photography the easy way.  The easy way is boring—like the results of just sticking a product in a light cube—and rarely produces anything striking, different, or creative.

Most photographers using light cubes usually create flat lit subjects floating in a featureless void that is good for web product catalogs. This technique is also good for quick through put, not creativity. Whereas the studio photographers that built a custom set with complementary backgrounds, specialized product support and lighting designed to best showcase the products details always made the product appear more valuable and worthy of a hi-end catalog. 

I’ve found over the years by doing it the hard way that even if I fail in a studio set-up I always learn something valuable that improves that “shoot” and others in the future. 

So, here’s my super shiny target pistol as a nice example of a difficult reflective subject…


 f13.0 @ 1/125 sec., ISO 400: Lens @ 170mm
And just to make it more difficult I placed the pistol on Mylar over a rough surface!

Background & Mylar:
  • I chose one of my hand painted, brown tone muslins, because it went nicely with the grips on the pistol.
  • I used the Mylar for two purposes:
  •         1) The Mylar reflects the background giving me a foreground and base that color matches
  •              to the background exactly.
  •         2) The Mylar also gives me kicker reflections onto the underside of the pistol’s barrel.
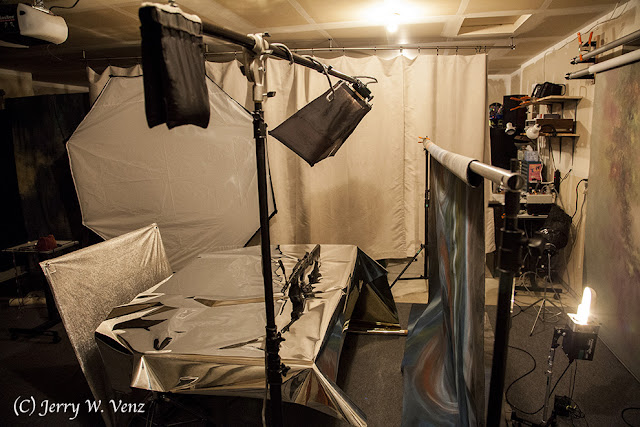
Here’s my lighting set-up….

Front View
The only thing different here is the background change-out for the photos of a rifle. As you can see I only used ONE LIGHT and a REFLECTOR!

Main Light:  A Larson RS 9”x24” Strip-light
Reflector:  A Photogenic 40”x40” Sil Foil Reflector

Here is a side view of the lighting set-up…

Lighting Side View

Important:  This is the most critical illustration of my set-up as it shows the Direction of the main light and its Relationship to the reflector.

NOTE:  That the main Light is NOT Pointed Directly at the gun; It’s pointed at the reflector.  Or, more precisely, my overhead main light is aimed so that tis trailing edge is just missing the top edge of the gun. This is why the modeling lights on professional studio flash units are so valuable. In a darkened studio the modeling lights on each flash head tell you exactly where each light is pointed showing us its effect.  In this case I merely tilted the overhead main’s soft box down until I saw its light hit the top edge of the gun and then tilted it back up just enough to miss its directly illuminating the gun. Why? If you point your main light at the highly reflective subject the highlights created will all just blow-out, and blown-out highlights—especially with digital cameras—are not recoverable.

Background Light:
To illuminate the backgrounds for these gun photos I tried something different. I used back lighting instead of the usual front lighting often used in the studio.  Why?
  1. I wanted a softer, lantern like, look to the background.
  2. Without front lights and their stands my walkway behind the prop table was cleared so I could more easily have access to make these adjustments to the main light and the guns.
This shoot-through technique worked really well, but because theses hand painted muslins are so thick I did have to use one of my photogenic 500 watt second power lights at nearly full power to be able to use f13.0 for my aperture; and than I had to go to 400 ISO to get the exposure I wanted.

Getting the Light on the gun:
The position you see of the silver reflector in front of the table is not exactly where it was as I took the images of the guns.  I had to minutely adjust the tilt of the silver reflector for each gun or knife as I watched the reflection of the overhead main light on the front surface of each gun.

Hope you enjoyed….’Til next week…

Author:  Jerry W. Venz, PPA Master Photographer, Craftsman
Training site:  http://www.LightAtTheEdge.com
Client site: http://www.TheStorytellersUsa.com

Tuesday, January 16, 2018

THEMED PORTRAITS OF TWEENS AND TEENS

When doing portraits of Tweens, Teens and high School Seniors, here at The Storytellers, in Meridian Idaho my absolute favorite type of session is the themed or personal storytelling variety. When I say that I’m not just talking about the jock with a football or basketball—we do that of course—but, I’ve found that there’s a greater creative challenge with teens that are involved in music—or any of the arts—animal husbandry (4H Clubs), any equestrian pursuits, sports like archery and shooting, hunting, motor sports (drag racing, motocross, etc.) winter sports (skiing, snowboard, snowmobile), and the non-motorized sports like skateboarding, BMX or Triathlon.

I’m sure I left something out, but you get the idea. Photographing people who are really passionate about these activities, as they do them, can create a connection between us that makes it easier for them to be more at ease when we finally do their more formal (looking at the camera) portraits.

Conversely the portrait session of a tween or teen that I dread the most is when the parent tells me that they don’t do anything! Often this really means that their teen worn’t perform the activity in front of my camera—which is ironic these days when they share everything on social media!

So, when we got the call to schedule this tween’s portrait session and Mom told us that her 16 yer old daughter was really into all things Harry Potter, my dread factor went up a bit. Hoping for the best, Kathi told the mom to bring everything they had in the Harry Potter theme.


As always, we started with the props…
f11.0 @ 1/150 sec., ISO 200; Lens @ 82mm
After I saw her collection of magic wands, I put up my “magical” background to get her in the mood to cast some spells! My dread factor quickly disappeared when I saw this young lady casting her spells with such grace and poise.


She did a clothing change while we changed the background for the Harry Potter books image. I loved her collection of dog-eared Harry Potter books! We did this in a variety of ways, but I liked her actually reading the book—more as a candid image.
Here’s my studio set-up with this background…

Caption: Photogenic PowerLight on the Main Light: Photoflex, 7-Foot, Octo-Dome; Other Lights: Norman Pack using a Larson 24” strip light (hair light) and one Norman head on background. Reflector Photoflex, 42”, White/Gold; white side to the subject.

Then the portrait that moms want…

f11.0 @ 1/160 sec., ISO 400; Lens @ 170mm
Looking at the camera and smiling came easily for this young lady.  Then we went for something more thoughtful….
 f11.0 @ 1/160 sec., ISO 200; Lens @ 150mm
I usually do something in Black and White and I like this composition with its “negative space” to the left. I also like to do portraits of people both smiling and not smiling to see which they are more relaxed with.

Often the non-smiling portrait gives me bigger eyes—which I prefer in a portrait—because many people’s eyes narrow as they smile.

That’s it for this week….happy to answer questions…’Til next time!

Author: Jerry W. Venz, PPA Master Photographer, Craftsman
Training site: http://www.LightAtTheEdge.com
Client site: http://www.TheStorytellersUsa.com

Tuesday, December 5, 2017

A MASTER PHOTOGRAPHER’S VIEW ON LIGHT; Part 2

As photographers we use our camera to create images that transform three-dimensional objects, in the real world, into a two-dimensional facsimile that we then output to yet another two-dimensional medium—the print, a computer monitor, cell phone, or the like.  It’s out job to recreate the illusion of three-dimensionality in these two-dimensional media, before the image is captured, with the use of dimensional lighting. That is lighting that is Directional—and that means any one direction other than from camera position. It’s that simple.

In Part 1 I mentioned the great classic painters who perfected the art of realistically portraying the world in three-dimensions; and the modern cinematographers who studied those classic painters. I encourage you to check out my list of truly great cinematographers—study their films!

STUDIO LIGHTING—PORTRAITS:

Oddly some of the worst lighting I see these days is by studio photographers.  It’s ironic because studio portrait photography hit its zenith in technique and gained world wide fame in the 20th century from the masters I studied like Yosef Karsh, Aronold Newman, and George Hurrell.  Don’t photographers today study these masters?

What I see way too much are portraits using flat lighting—as though the photographer was going to photograph a postage stamp collection. Flat Lighting is fine if your subject has only two-dimensions.  Otherwise, there’s no excuse for flat lighting in the studio!

It’s in the studio where we have TOTAL CONTROL of both light and camera placement.  In the studio we are God—saying, “Let there be Light” exactly where we want it!

It’s all about direction….

F11.0 @ 1/200 sec., ISO 200
Depending on how many subjects are in the front of my camera my main light is placed at 7, 8, or 9 o’clock when on the left or the reverse 5, 4, or 3 o’clock when on the right.

For this little girl’s portrait I had my main light close to the 9 o’clock position with a soft white reflector at the 3 o’clock. No other fill was used.

NOTE:  The key to directional lighting is to not ruin it with fill light.  I never us a fill light in my studio--not even with groups!

Here’s my basic studio set-up….


That main light, on wheels, is a 7-foot OctoDome by Photoflex; nothing “wraps” better than a large soft box.

And a ballerina on that background….
f11.0 @ 1.200 sec., ISO 200
For her portrait I had the main light at 9 o’clock with it feathered away from the background. No reflector or other fill was used. The “hair light” was left on to light her raised foot.

Showing how a large main light will “wrap” on a group….
This portrait was a Professional Photographers of America International Print Competition Loan Collection Winner in 2014.
In this portrait I placed my main light on the left at about the 7 o’clock position—just out of my camera’s view. I did use a soft white reflector on the right at the 3 o’clock position.

Another Leonardo da Vinci quote:

“The Artist who can make his subject appear to be in the relivo (made to appear to have elevation, with depth and dimension) is he who should receive the greatest praise.”

So, go forth fellow photogs. and work on your “relivo”!  ’Til next week….

Author:  Jerry W. Venz, PPA Master Photographer, Craftsman
Training site: http://www.LightAtTheEdge.com
Client site: http://www.TheStorytellersUsa.com

Tuesday, June 27, 2017

ADVANCED STUDIO PORTRAIT LIGHTING FOR PROFESSIONALS

It took me 20 years as a professional photographer to learn that it’s not about how many lights you use it’s about using the fewest number of lights to create truly dramatic results. I learned early in my career the basic 5-light set-up from Monte Zucker (at his week long, hands-on West Coast School for Professionals at the Brooks Institute). His light placements and equally important subject poses were marvelous and I still use some of his techniques today. What I found difficult was using the standard 5-light set-up (Main light, Fill light, Hair light, and two background lights—or one background light and one kicker) in a very small camera room. You see the more lights you use in a small studio the more bounce you get—which creates more fill-which flattens out the lighting. And flat lighting really sucks the dram out of your subject. It took me a long time to realize that slavishly adhering to lighting convention—doing what everybody else was doing—was why my lighting lacked three dimensional drama.  And the reason, the culprit, was the FILL LIGHT.

My epiphany came at a professional photography seminar in San Francisco taught by Will Crockett.  He showed us his lighting technique using the Elinchrom, six foot, soft box with NO FILL. It was then I realized that the only reason for a fill light was to compensate for too small a main light. He showed us that with a large Main Light as close to your subject as possible its wrapping effect made fill unnecessary. The results were stunning!

So, I got an even bigger soft box! When I built my new studio here in Idaho I partitioned it so that my camera room was the biggest room in my reinvented photography studio. So, I got the Photoflex, 7 foot, Octadome and permanently banished my fill light to its case—as my back-up mono-light.


Here’s an example of the big light without fill…

 f11.0 @ 1/200 sec., ISO 200
The key to using a large soft box—and not needing a fill light—is to place it in close and move it across the set (nearly in front of your camera) so the you get light in the subject’s far eye.  I want the big catch lights in both eyes!  And by deleting the fill light (usually back behind the camera) you eliminate those ghastly tiny catch lights (I call them ice-pick catch lights!) in the middle of your subject’s pupils.

This lighting technique produces a nice shadow side on your subject(s) creating the three dimensional quality of light that traditional artists have always sought. Depending on the number of subjects—because with more subjects I must move my main light away from them—I may add a white or silver reflector opposite the main to decrease the lighting ratio; but I never eliminate the shadow completely.

Here’s a group portrait using this technique….

PPA (Professional Photographer of America) International Print Competition Loan Collection winner 2014
This image was my PPA (Professional Photographer of America) International Print Competition Loan Collection winner 2014.  And, here’s the studio I designed around that 7-foot soft box...
Store Front Studio - Eagle, Idaho
You’ll note that my main light is on wheels—it needs to be easy to move. On the left is my white reflector on an adjustable arm.  Overhead is my hair light on a Bogen boom.  I have three other lights: two for background illumination and a kicker with a snoot.

Just one more…

This close-up shows just how sweet a very large soft box will “wrap” the face creating a very smooth transition from highlight to shadow.  I didn’t even need a reflector on this portrait and of course none of those “ice-pick catchlights” for this little cutie.

As usual, should you have questions please don’t hesitate to ask….’Til next week.

Author:  Jerry W. Venz, PPA Master Photographer, Craftsman
Training site:  http://www.LightAtTheEdge.com
Client site: http://www.TheStorytellersUsa.com

Tuesday, April 25, 2017

PORTRAITS OF HIGH SCHOOL SENIORS WITH WHAT THEY’RE JAZZED ABOUT!

My favorite hight school seniors to photograph are those that are involved in sports or the arts or something where we can introduce, as props, things they can interact with that tell the viewer what they’re passionate about. We’ve also noticed when doing people’s portraits that they are more relaxed when holding something familiar.  Personal objects tend to have a calming effect making them less aware of the camera.

So, when I found out that this young man from Eagle High School (Eagle, Idaho) was a musician and played saxophones in several bands, including their Jazz band, I asked his mother to please bring his instruments to the session!  This was special to me because I played the Alto Saxophone way, way, back in Junior High School and have always loved its sensual sound. 

His mom wanted portraits of him in his tux, so we started in the studio with his Alto sax…
f13.0 @ 1/200 sec., ISO 200
After we did the usual yearbook portraits I changed-up the lighting for this very dramatic lighting of him playing his sax.  I placed my 7-foot main, soft box, 90 degrees to the left of camera and removed my usual white reflector from camera right—if you want drama in the studio remove ALL FILL! The only other lights are the background and hair lights.  

Next we moved outside to a local park with him more casually dressed and toteing his baritone saxophone….

f5.0 @ 1/500 sec., ISO 400; lens @ 200mm
I like the big baritone because it does not get lost in a full figure pose—it has substantial presence!

So, I had to do a close-up to highlight it’s marvelous detail…

 f5.0 @ 1/500 sec., ISO 400; lens @ 200mm
He really liked this particular image! Mom wanted some close-ups without the saxophone so we moved to a spot with a nice backlit background.  By now he was very relaxed with us so we had him sit on a low, split rail, fence while mom coaxed a smile out of him.

Our favorite was this nice neutral look showing his quiet intensity…
f4.5 @ 1/500 sec., ISO 400; Lens @ 200mm
By using f4.5 @ 200mm I always get a nice painterly look in my backgrounds and good Bokeh from the backlight’s specular high lights.

That’s it for this week…have any questions or comments feel free…’Til next week…

Author:  Jerry W. Venz, PPA Master Photographer, Craftsman
Training site:  http://www.LightAtTheEdge.com
Client site:  http://www.TheStorytellersUsa.com

Tuesday, April 11, 2017

DRAMATIC STUDIO LIGHTING: OLD TOOLS AND GUNS

I was going to just write a blog on this topic until I though about how many paragraphs it would take trying to describe the complex set-up and execution of dramatic studio lighting. 

The kind of lighting I do is not the usual product photography where photographers just put the object in a translucent light cube creating flat directionless light of the object floating in a white field, like what is used for catalogs. That’s not dramatic or even interesting and it’s certainly not art—that’s why I never wanted to do catalog photography.

Anything  you can put on a table top can benefit from the use of dramatic studio lighting. The following short video shows that my method is not really difficult and well worth the effort.


'Til next week...Let me know how you like the video format...

Author:  Jerry W. Venz, PPA Master Photographer, Craftsman
Training Site:  http://www.LightAtTheEdge.com
Client Site: http://www.TheStorytellersUsa.com

Tuesday, March 21, 2017

STUDIO MOTORCYCLE PHOTOGRAPHY ON A BUDGET

Studio photography of motorcycles is complex and time consuming. That’s why so many photographers would rather go on location outside and use natural light—I know I prefer that alternative! But, on occasion, I really like getting in the studio to do this kind of very technical, often problem solving, photography. I think the reason many of today’s photographers do much of their photography outside is that they don’t want to invest in a studio lighting kit, backgrounds, and all the many studio support tools needed to build a studio.  Of course, then, they have to learn how to use all this equipment! That’s probably the biggest sticking point today.

What I’m going to share in this blog is how I did motorcycle studio photography back before digital (on film! ) and on a budget before I had the multiple sets of studio lights I have today.

So, flashing back to 1994….

f11.0 @ 1/250sec., ISO 100; lens: 65mm
This image was taken with my Mama RB-67 Pro-S on Kodak LPP, Lumiere 100, slide film in the 6x7cm format.  The low budget part was lighting my set with just Two Flash Heads on a Norman 500 w/s pack and just using reflectors as fill. That’s it, I didn’t own any more studio gear back then!  And, because of the then high tech., not so instant, image preview method, called Polaroid, I can show you my studio set up…


The Polaroid back on my RB-67 is what made studio photography possible before digital. 

Note:  This only applied to Technical studio work. We never “pulled Polaroids” when doing studio portraits of people—2-minutes was way too long to wait for the Polaroid to develop!

As you can see I used two relatively small soft boxes, at the ceiling, mounted on either side of the garrage door opener (I had a garage studio back then too…) That ruled-out using one large soft box, as is customary today, which was fine since I didn’t own anything else!

Now, the key to make this lighting set-up work was pointing both my main lights not directly at the motorcycle—but at my reflectors. I have the lights just skimming the top edges of the bike. Usually this meant my lights were angled at about 45 degrees towards the camera.  This meant I needed to flag my lens to prevent flare from my lights.

The only change I made from the Polaroid in my studio set-up was replacing the white drapes, on either side of the set, with black drapes to control bounce.  This next image was of MY baby…


 f11.0 @ 1/125 sec., ISO 100
This image of my favorite all time bike the Kawasaki Ninja 900 (1984) was done on Kodak, EPZ, Ektachrome, 100X Pro using my Mama, 645 format, camera.  The studio lighting was the same in this image. The most critical part here was getting my reflectors angled to reflect the lighting onto the front surface (the wheels, disk brakes and engine) of the bike.  Hooray for Polaroids! The only thing that would have improved this image would have been edging the tires with talcum powder to create separation highlights, but I didn’t learn that trick until many years later.  Another little trick I have learned along the way doing commercial photography is to dull shiny surfaces with hair spray.

So, that’s how we did it on a budget and before digital…

’Til next week…have questions don’t hesitate to ask.

Author:  Jerry W. Venz, PPA Master Photographer, Craftsman
Training site:  http://www.LightAtTheEdge.com
Client site: http://www.TheStorytellersUsa.com

Tuesday, June 28, 2016

ONE LIGHT STUDIO PORTRAITS - GROUPS

It’s a very easy case to make when advocating a No Fill Light - One Light set-up for portraits for individuals, but when doing groups—now that will make many photographers really nervous! Removing the fill light from most photographers’ studios would be like taking away a toddler’s security blanket! 

I must say that when I retired my 36x48” softbox, which I KNEW was incapable of group portraits without a fill-light, and upgraded to the Photoflex, 7-foot, Octodome, I was skeptical before I tested it. In fact, when I first set-up my new studio, 6 years ago, I put up my usual fill light, in a big silver umbrella, up high, behind me—just in case. I wanted my blankie near me! I found that when used properly, placing that big light as close to my subjects as possible (without being seen in my viewfinder) the results were fabulous! Of course, I tried it both ways—turning the fill light ON for comparison and the fill light just flattened out the light—making a boring two-dimensional rendition of my subjects.

Just to be clear when I say “One Light Portrait” I’m referring to how may lights are striking my subject’s faces. There are at least 3 and often a total of 4 lights being used on the set when doing groups: 
  1. You need a hair light to put some sparkle and separation of hair especially with dark backgrounds.
  2. You need at least one background light and often two-lights as the group gets larger because the group blocks light and makes the background much darker on the side opposite the main light.
  3. What I’m eliminating is the 5th Light—the Fill Light—the only light that is creatively destructive to the studio portrait.
As proof of concept I offer the following image. It was a Professional Photographers of America, International Print Competition, Loan Collection Winner in 2014.

 f11.0 @ 1/200 sec, ISO 100
Lighting: 
  • One, 7-foot, Octodome Main Light
  • No Fill Light
  • One white reflector on camera right
  • the usual two background lights and one hair light
This was my first studio set-up with the 7-foot Octodome. Note the white reflector on the stand on the left. Most importantly notice that my main light is on wheels. You need to easily move your main light, otherwise it may take root, as I’ve seen in some studios, never changing position again!

Store Front Studio - Eagle
This next group portrait with 6 Adults and one child pushed my new studio to the limit. We’ve moved our studio into our home and made the two-car garage into the camera room, so with groups any larger than seven or eight people we go outside to the many beautiful outdoor Idaho locations.

This is the new studio designed in the garage space…

Home Studio
It does not look very big, but the background displayed is 10 feet wide and 20 feet long and the wall mounted Bogen support poles are 12-feet long. The 7-foot Octodome is placed in about the right position for a group, as is the single background light, to the right, on the little roller stand.

Here’s the group portrait in the new studio…

f11.0 @ 1/600 sec., ISO 200
Lighting: 
  • One, 7-foot, Octodome Main Light
  • No Fill Light
  • Two silver reflectors on camera right
  • the usual two background lights and one hair light
The biggest difference between this larger group and the portrait of the girls is the spacing of the subjects—making the group wider—so with more distance between my main light and the people on camera right there’s light fall-off. That creates darker shadows on the people at camera right. 

I do several things to make the light even across a group:
  1. Stagger the Group: I set-up the seating so that they are not just lined-up flat to the camera. They’re on a diagonal with the people on the right closer to the camera than the people on the left.
  2. Increase reflector efficiency:  Instead of my usual white reflector I used two Silver reflectors to balance their facial shadows.
  3. Feather the Main Light:   With larger groups you can’t just point the light at the group or you’ll over expose the near people and underexpose the far people. So, I point the Main Light AT the Silver Reflectors on the other side of the group.
So, that’s all there is to it! Piece of Cake!  No, not really—this is the most difficult kind of studio photography; the more living, breathing, people or critters in front of the camera the harder it is!

In closing, I’d encourage photographers, as I mentioned in my prior Blog One Light Studio Portraits—Individuals, to study lighting outside the photographic community. The classic painters 350 years ago knew how to use directional light to create the shadows that made their subjects three dimensional.

Look up the Dutch Master Johannes Vermeer’s portraits using window light: my favorites include “Woman Holding a Balance” and “Girl Interrupted at Her Music”!  His use of window light has been one of my influences in changing my lighting style in the studio. ( Here is link for you:  http://www.essentialvermeer.com/vermeer_painting_part_one.html#.V2Qs4xIrIlL  or the main site link is: https://www.artsy.net/artist/johannes-vermeer )

To quote another great artist, Leonardo da Vinci,
“The artist who can make his subject appear to be in relivo (made to appear to have elevation, with depth and dimension) is he who should receive the greatest praise.”

Author:  Jerry W. Venz, PPA Master Photographer, Craftsman, Certified
Training site:  http://www.LightAtTheEdge.com