Tuesday, February 27, 2018

NATURAL LIGHT EQUESTRIAN PORTRAITS IN THE BARN


When we do portraits of horses and their owners we often start them in a barn or out building.
This serves two purposes:
  1. If we’re starting photography at a less than ideal time of day when the light is flat, and thus directionless, we use “barn light” to create dramatic portraits.
  2. These interior portraits give our clients additional choices with a really different look than the outside portraits; and that usually gives us higher sales!
For some reason I rarely see other photographers use barns properly for equestrian portraits with their owners. These photographers often put the horse and owner IN the barn’s doorway using it as a framing device. Then with their subjects facing the outside or inside of the barn all they get is Flat Light!

My basic rule:
  • For interior barn portraits the barn is Not the Subject the barn is the Light Source! 
  • And just like studio or window light portraits I do not photograph my Light Source; why? Including the light source in your portrait will only create a large, over exposed, distraction that you never want in a low-key portrait.
The open door of a barn creates a light that is just like a large window, which is probably the Best light for portraits. And just like the light from a window barn door light is softer near the opening and harder as you move your subjects deeper into he barn—provided there are no other light sources in your barn.

I usually place my subjects from 1/4 to 1/3 of the way into the barn—depending on what I find as a background for my subjects…


f8.0 @ 1/250 sec., ISO 400; Lens @ 50mm - You don't usually see me at 50mm, but this was a really small space!

I’m extremely picky about my portrait backgrounds and will only allow tools or tack on the background walls if they’re not too distracting. I prefer the simplicity of nice bare barn wood like the above portrait of this hight school senior with her old horse.

NOTE: Just like the I do window light I do not allow the use of barn door light if there is Direct Sunlight flooding the opening. I only want Sky Light on my subjects!

Don’t hesitate to ask if you have questions….’Til next week…

Author:  Jerry W. Venz, PPA Master Photographer, Craftsman
Training site: http://www.LightAtTheEdge.com
Client site: http://www.TheStorytellersUsa.com
Tuesday, February 20, 2018

FINE ART BARN WOOD PHOTOGRAPHY


I’ve been doing photography of the barns in Idaho ever since we arrived here in the Treasure Valley (Boise, Idaho area) back in 2009.  Creating fine art images of these vanishing beauties has become a passion and a duty especially since development has started again at a break-neck-pace. It will soon be the case that all the barns will be gone near any developed cities here in the Treasure Valley just as happened in California. Where we came from in Silicon Valley (Northern California) there were only a couple barns left that were once surrounded by vast orchards replaced long ago with housing developments and High Tech corporations.

In this blog I’ll be focusing on barn details highlighting great old barn wood textures and colors. This is one of my specialties when I do any outdoor fine art photography and as I’ve said in other blogs: “You can often reveal more about a subject by showing less of it.”

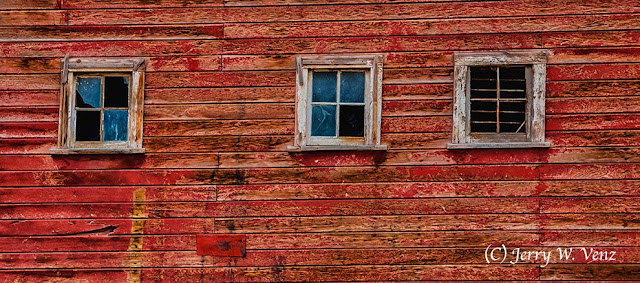
 f10.0 @ 1/60 sec., ISO 800; Lens @ 60mm

This big old barn (circa 1905) in Nampa, Idaho, is an arched roof type barn; one of my favorite types. Since its still got some old paint on it I kept this image in color and zoomed-in on those three marvelous windows.  Done this last December on an overcast afternoon the soft light lowered the contrast and kept the white highlights in check. I’ll be returning to this barn soon!

NOTE: Don’t forget the “outbuildings”!

Most farms have numerous smaller out buildings in addition to a barn. Sometimes the outbuildings are in worse shape than the barn and that condition makes them ideal for detail images! This outbuilding is nearby that barn I just talked about….

 f8.0 @ 160th sec., ISO 800; Lens @ 100mm
This is a chicken coop apparently constructed with reclaimed boards that have weathered nicely. I love the mix of colors, the textures and especially those random imprinted letters!

Another nice outbuilding….
f13.0 @ 1/400 sec., ISO 400; Lens @ 170mm
This outbuilding is on a property in Eagle, Idaho, near a barn I’ve been photographing for several years. This old outbuilding is skewed because it’s leaning; it may not be standing much longer. So, naturally it’s become one of my favorite subjects! This structure became an obvious choice for a Black & White conversion since it has no paint left on it. What drew me to this crop (by zooming my lens to create this composition) was that I could see through the building looking out the chicken wire covered smaller window with that large weed giving me a secondary center-of-interest. I like to have layers of interest in my fine art images.

’Til next week….

Author:  Jerry W. Venz, PPA Master Photographer, Craftsman
Training site: http://www.LightAtTheEdge.com
Client site: http://www.TheStorytellersUsa.com

Tuesday, February 13, 2018

FINE ART PHOTOGRAPHY; SHOWING LESS CAN REVEAL MORE!

Photography of old and ancient things—either man-made or natural, has been an artistic passion of mine for over 40 years. So, as such, I really don’t do “documentary photography”; that is straight-up, backed-off, un-manipulated pictures of things just as I found them. I call that a “record-shot” and I only do those to accompany one of my blogs or as a teaching tool for my students. 

As artists we interpret the world, we idealize our subjects, showing our audience a different point of view. Sometimes we push that vision to an alternate reality. The problem with the record-shot is that it’s too literal. You instantly recognize the thing that it is and move on—no thought process required; Boring!  I’m not afraid to produce an image that most people can only guess its source.  I like to make people think. However, I’m not talking about pure abstract images—I’ve been known to do those as well! Pure abstracts are too easy especially in the digital realm. No, I’m talking about something more subtle; using my vision of parts of an object to hint at its whole.
f11.0 @ 1/100 sec., ISO 400; Lens @ 24mm
When I find a worthwhile subject I like to start with close-ups. I’m looking for the details that tell us about its nature—its history—how it has weathered time. I tell my students, “showing less can often reveal more about the object!”

Then I start showing more…
f20.0 @ 1/160 sec., ISO 400; Lens @ 24mm
This is a reverse angle from within my subject using wide angle distortion as a compositional effect; the leading lines of its structure pointing back to that colorful wall.

Then backing out, the way I came in, to reveal the other side—the entry way sans door.
f8.0 @ 1/1250 sec., ISO 400; Lens @ 35mm
I had pre-visualized this exact image of this subject years before with those fall colors visible through this doorway, but was never able to coincide a visit here during the fall along with great lighting, at the same time!  

And finally the reveal of my subject as a “record-shot”….
 f8.0 1/200 sec., ISO 400; Lens @ 67mm
This is an old Basque Sheep Herder’s Wagon on display at the Idaho Botanical Gardens (Boise, Idaho). 

So, that is my artistic process for photography of most objects. I carve up my subject—often with telephotos as my knife—dissecting the subject to show its details. Sometimes I don’t even show the whole subject—that’s what too many other photographers do all the time!

’Til next week…

Author:  Jerry W. Venz, PPA Master Photographer, Craftsman
Training site:  http://www.LightAtTheEdge.com
Client site: http://www.TheStorytellersUsa.com

Tuesday, February 6, 2018

BEST APERTURES FOR PORTRAITS FOR GOOD DEPTH-OF-FIELD AND BOKEH

Most competent professional photographers would never do group portraits with their lens wide-open with a f1.2, f1.4 or even an f2.8 lens. Then why do so many photographers think they can get away with using these apertures when dong an individual portrait?  OK…I can get it if they’re experimenting on their personal work, but is it worth the risk of turning off a paying client to have half the clients’ face out-of-focus because they used f1.4 and only got a depth-of-field of just one inch?

Some say in defense that they wanted some good Bokeh in the background.  Now, I’m a Real Bokeh Lover in my portraits, as well, but I will not sacrifice my client’s images on the altar of Bokeh! You don’t have to use those risky wide apertures to get great Bokeh—you just need to educate yourself about Depth-of-Field as it relates to Focal Length and Distance—both from your subject and the background.

I discovered over 30 years ago that good Bokeh was more about the focal length than about the aperture. That’s why my usual focal length for individual portraits is 200mm. With your lens at 200mm you simply don’t need a very wide aperture for good Bokeh…


f5.6 @ 1/125 sec., ISO 400; Lens @ 200mm
Most Bokeh lovers would not consider f5.6 a useful aperture, but at 200mm, as you can see, that background is beautiful and I have plenty of depth-of-field on the whole boy. The only negative thing about my camera set-up for the above image was the use of 1/125th sec. as my shutter speed with my lens at 200mm. When doing hand-held photography, especially with telephotos, I like to adhere to the old rule of one-over-focal length for a safe shutter speed. So, when I’m at 200mm I like to have my shutter speed at 1/200th or 1/250th sec., even though I do own a very expensive 70-200mm image stabilized lens.

So, how wide will I regularly go for good Bokeh and adequate depth-of-field? I consider f2.8 just too risky—especially with active children as subjects. Here are the numbers…

Lens: 200mm
Distance: 10 feet
f-Stop: f2.8
D.O.F. (Depth-of-Field) 1 1/2 inches

Now a depth-of-field of 1 1/2 inches can work OK, but only if your subject’s face is flat to the camera (even then their ears may be soft), but as soon as they turn their face away from the camera their far eye will go out-of-focus.

So, my preference is f4.5 for individual portraits—here are those numbers…

Lens: 200mm
Distance: 10 feet
f-Stop: f4.5
D.O.F.: 2 1/4 inches

And here’s what that looks like….

f4.5 @ 1/400 sec., ISO 800; Lens @ 200mm
Note: The other reason I use f4.5 in lieu of smaller apertures like f5.6 is that I want a higher shutter speed so that I can hand-hold my camera with more stability when I’m at 200mm.

The following image shows how distance can change the look of your background Bokeh…

f4.5 @ 1/320 sec., Iso 400; Lens @ 280mm
Compared to the first two images three things are different in my set-up here:
  • I’m Farther Away from my subject; about 30 feet.
  • My background is Closer to my subject; about 30 feet.
  • My lens is 280mm.
Distance Changes Everything - D.O.F. & Bokeh
  • Because I’m farther from my subject I’m getting more D.O.F. (e.g. when you back-up 10 feet you can double your D.O.F.)
  • With my background so much closer to my subject here my Bokeh is sharper and not as soft as in the previous two images; the background was about 50 years away in the first and 25 yards away on the second image.
  • The reason the background Bokeh is as nice as it is in the girl’s portrait is the addition of my 1.5x extender on my 200mm lens brings my focal length to 280mm.
More telephoto is almost always better than less!

If you want to check out YOUR settings to determine the Depth-of-Field:
GoTo: DOFMASTER.COM
Use: Their online depth-of-field calculator. (They even have an app for i-phone and i-Pad)

After you select your camera type simply plug-in your focal length, f-stop, and distance and it will calculate D.O.F. and more. It’s very educational!

’Til next week…Let me know if their is a subject you would like me to write about.

Author: Jerry W. Venz, PPA Master Photographer, Craftsman
Training site: http://www.LightAtTheEdge.com
Client site: http://www.TheStorytellersUsa.com