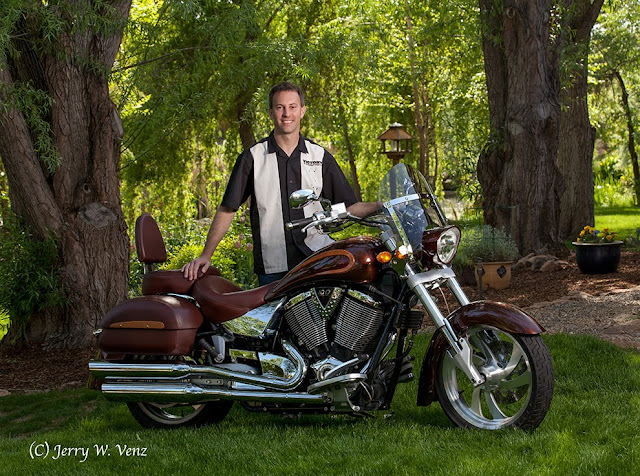
Natural light outdoors is my preferred source, especially when doing people. But when the main subject is an object, as in this commercial product shoot, with a lot of dark features mixed with very shinny parts, like this new retro-motorcycle, supplemental light is often required. To control the highlights in the chrome and polished alloys we set-up in the shade and started as late in the afternoon as we could to lower the difference in exposures between the natural light background and the shaded grass area. This procedure effectively reduces the dynamic range of the scene.
 |
|
f8.0 @ 1/125 sec., ISO 400, lens @ 85mm
|
This final image was a very simple lighting set-up. I have a single 50” Halo, shoot-through, umbrella/soft box just out of frame on camera right. On camera left I placed a 42” sil-foil (silver) reflector. That’s it—the rest is balancing the exposure between the background and the flash.
Here’s the before image done by natural light alone..
 |
|
f8.0 @ 1/60 sec., ISO 400
|
It’s OK, but for a commercial image the light is too flat and dull—it needs more punch to bring the motorcycle “forward” to the viewer.
Key Point: Natural light in portraits outside tends to “push” your subject into the environment. While adding flash on subjects outside tends to “pull” the subjects out of the environment.
Balancing the Light
The scene metered (incident light) f8.0 @ 1/60 sec., at ISO 400 by natural light. So, I used f8.0 as my aperture setting and metered my flash to be f8.0 at subject position. Next, I adjusted my shutter speed to control the natural light level in the scene.
Key Point: Just like studio photography, when doing photography outdoors with flash, the camera’s aperture controls the flash exposure and the shutter speed controls the ambient light.
For example: If you want the camera to see a lot of a room’s existing light you simply “drag the shutter” (set a slower shutter speed), along with your flash to brighten up the scene. This is a common technique we used in wedding photography.
As you can see in the natural light image above the background is a little “hot”, so to bring it’s exposure down I bumped my shutter speed up (faster) and did test shots until it looked good on my camera’s screen. Don’t you just LOVE our digital camera capabilities! I know I do! In the old days, on film, we did this testing with Polaroid film backs on our medium format cameras—it was slow and time consuming.
I ended-up at 1/125th sec. (not much of an increase in shutter speed) because after a half-hour of testing the sun’s lower position had decreased the background light.
We brought the bike out into the sun to do detail shots of the bike’s custom paint and detail features in close-up.
Then my Photoshop Diva (my wife Kathi!) made this poster for our cross promotional advertising campaign.
Showcasing their custom paint artistry using our artistic talents was a fun collaboration.
Hope you enjoyed…should you have questions don’t hesitate to ask…’Til next week…
Author: Jerry W. Venz, PPA Master Photographer, Craftsman, Certified
Training site: http://www.LightAtTheEdge.com
