Tuesday, March 27, 2018

PHOTOGRAPHY OF HAKONE’S SECRET BAMBOO GARDEN


I’ve been doing photography of Hakone Gardens (Saratoga, CA) bamboo since 2003. This beautiful 100 year old Japanese garden has many traditional Japanese features that have evolved over the decades making it a real treasure in California’s Silicon Valley. Hakone began receiving some highly prized and fragile bamboo from Yasui, Japan in 1985 and with other local donations the bamboo gardens flourished under the care of the Bamboo Society. Because of the fragile nature of sprouting bamboo access to the bamboo gardens by the general public was limited—behind locked gates. Because of the donations of my photographs documenting Hakone I was granted access to the bamboo gardens whenever I felt the timing was right (the best lighting) for great images. 


This is the view of the bamboo garden (in the background) as scene from Hakone’s parking lot.


f8.0 @ 1/25th sec, ISO 400; Lens @ 40mm
Taken in August I chose open shade in the evening, to capture the greenery without blowing out the highlights that happens when direct sunlight falls on leaves. 

This is the view of the entrance to the bamboo gardens just after the gate…

f8.0 @ 1/320 sec., ISO 400; Lens @ 70mm
I did this on an April morning. Most of the time I find that one or two hours before sunset (the”Magic Hour”) gives me the best directional natural light for most outdoor photography, but inside the bamboo garden the only time sunlight penetrated that area was in the morning.

f5.0 @ 1/640 sec., ISO 400; Lens @ 120mm
A nice example of directional natural light using selective depth-of-field and a relatively wide aperture to high light that oddly shaped growth of bamboo.  

The following images illustrate the different states of development for the propagation of bamboo…

The tendrils at the base of the plant travel down and create the rhizome system that spreads out to nurture a forrest of bamboo.


The shoots sprout around the mature bamboo and grow very rapidly—up to 36” in 24 hours!


This close-up shows the protective sheath starting to fall away from the now hardened culm; the green area.


Then you end up with a forrest of bamboo in no time!


This is the rare, highly ornamental, Tortoise Shell Bamboo; called Kikko in Japan.
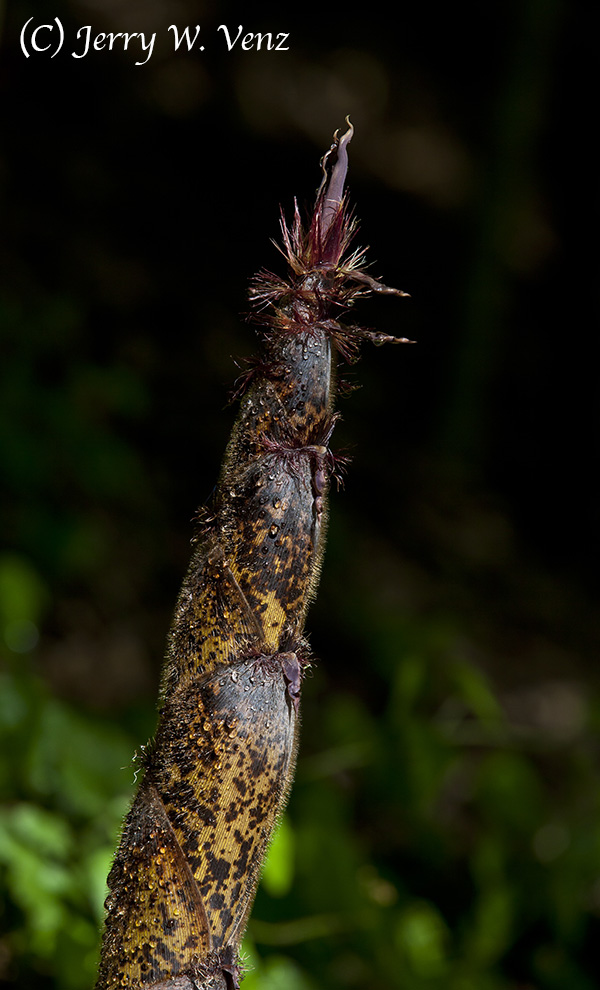

Here’s some nice lighting showing the detail on a bamboo shoot.  Is it me or does the top of that thing look like a crowing rooster?  I really like learning about what I am photographing…it gives my images more meaning…Fascinating stuff—bamboo—hope you enjoyed seeing its genesis.

’Til next week…

Author: Jerry W. Venz, PPA Master Photographer, Craftsman
Training site:  http://www.LightAtTheEdge.com
Client site: http://www.TheStorytellersUsa.com

Tuesday, March 20, 2018

PHOTOGRAPHY OF A JAPANESE GARDEN IN BLOOM


I’ve been documenting the beauty of the Hakone Japanese Gardens in Saratoga, California, for over 20 years. As one of the National Trust for Historic Preservation’s premier sites and 100 years old Hakone is one of the oldest Japanese gardens in the Western Hemisphere. In 2004 It was selected as one of 12 national sites to receive funding under the Save America’s Treasures Program. In 2013 it was placed on the National Register of Historic Places.

I’ve been supplying the Hakone Foundation images for their publicity and funding campaigns for the past 15 years. I’m proud that my images helped the Hakone Foundation to win the funding grant in the Save America’s Treasures program.

Here’s the entrance to the gardens....

f11.0 @ 1/160 sec., ISO 400; Lens @ 58mm


The main gate, with its large double doors, constructed using bamboo, has always been a favorite feature of mine. One of the best times to photograph the gardens is in early April when the most colorful blooms appear. This view shows off one of the garden’s most well know features—the bridge over the Koi pond with that old gnarled tree at its entrance.


f11.0 @ 1/125sec., ISO 400; Lens @ 50mm
I waited for backlight for this image to really make the blossoms and the tree’s foliage glow. 

The wisteria covered gazebo, on the pond, is one of my favorite spots at Hakone…


f13.0 @ 1/60 sec., ISO 400; Lens @ 24mm
This was done April 10th at 3pm; I photograph the wisteria either under overcast sky or I wait until its not in direct sunlight to avoid over exposure of its highlights.

Then there’s the marvelous waterfall…


f22.0 @ 1 sec., ISO 100; Lens @ 35mm
This waterfall cascades down three tiers in a span of about 12 feet. It was taken the day after the last image, but I came back at nearly 7pm so that this side of the mountain would be in total shade to control the highlights and lower the overall light level.  Then I could use a 1-second time exposure to get the smooth effect on the falling water.   I still had to lower my ISO and use an aperture of f22.0 but that was by design because I wanted lots of depth-of-field too!

At the end of February my favorite tree blooms….


 f8.0 @ 1/160 sec., ISO 800; Lens @ 44mm
This is a Japanese weeping cherry tree. I really like the dramatic color contrast of its blossoms against the greenery in the background.

I did this image at noon on an overcast day to, again, control the highlights. With blossoms like this you must do close-ups…

f8.0 @ 1/250 sec., ISO 800; Lens @ 126mm
  • TECHNICAL NOTE:
  • I used a relatively small aperture on this image (f8.0) because I wanted that row of blossoms to be sharp. I see many photographers, when doing close-up images, using really wide apertures—say f2.8 or even wider—thinking that if they didn’t their backgrounds would be too sharp thus loosing the isolation they want between the subject and the background. What’s important is the distance between the subject and the background. I made sure that the vine of blossoms I picked to photograph was far enough away from its background that even at f8.0, coupled with mild telephoto, the blossoms would be sharp yet the background would be nice and blurry. If I had used say f2.8 the depth-of-field would have been so shallow that only the leading edge of the blossom’s petals would have been in focus. 
Next week we’ll go into Hakone’s secret bamboo garden and see what few tourists get to witness—the genesis of bamboo. ’Til next week…

Author:  Jerry W. Venz, PPA Master Photographer, Craftsman
Training Site: http://www.LightAtTheEdge.com
Client Site: http://www.TheStorytellersUsa.com

Tuesday, March 13, 2018

OUTDOOR COMMERCIAL PHOTOGRAPHY AT NIGHT


If you’ve read my blogs before you know that I rarely use flash as a main or even as fill when I do photography outside. It just does not blend well with natural or even continuous artificial lights.   The great thing about our professional digital cameras is that we can use much higher ISO’s, with less noise, longer exposures, (on a tripod) and with the recovery possible using RAW files, it’s amazing what can be accomplished now without resorting to supplemental flash.

As an example the following commercial shoot I did outside about an hour after sunset was done with only the existing ambient and the continuous artificial lights at the location. I wanted those white Christmas lights on the truck to stand out; if I had used flash not only would those lights have all but disappeared, but the snow would have been way too bright.

Here’s the final image….

f6.3 @ 1/20 sec., ISO 800; Lens @ 45mm

The key to this image working was proper exposure of the highlights without too much under exposure of the darker areas. The most important highlight area was the large lighted Zamzows sign that was about 25 yards behind the truck. So, I exposed for that lighted sign and let the truck go a little underexposed. However, since upon reviewing the image on my camera I saw that I could read the lettering on the truck and I still had detail in the deep shadows I knew that I could recover all that underexposed area in post processing. 

Here is the original file….

Original Image
It’s remarkable what can be done just using Adobe Camera Raw to bring down highlights or recover shadow detail; ACR can recover 2-stops or more in a RAW file.

Here’s my ACR adjustments on this file:
  • Exposure + 1.10
  • Highlights -  94
  • Shadows + 55
  • Whites -  60
  • Blacks -  43
  • Contrast -  22
  • Clarity + 56
  • Vibrance + 8
After sharpening at: 67 I used Noise Reduction:
  • Luminance 50
  • Color 50
And finally I adjusted the white balance to remove blue from the snow and warm the scene a bit. Quick and easy…

Ask if you have questions…’Til next week…

Author:  Jerry W. Venz, PPA Master Photographer, Craftsman
Training site: http://www.LightAtTheEdge.com
Client site: http://www.TheStorytellersUsa.com

Tuesday, March 6, 2018

STUDIO PHOTOGRAPHY OF REFLECTIVE OBJECTS


If you’re looking for a quick, easy, method to photograph reflective subjects then look up tutorials using a light tent or cube because you’re not going to find it here. As a full time professional with over thirty years of studio experience I’ve never done studio photography the easy way.  The easy way is boring—like the results of just sticking a product in a light cube—and rarely produces anything striking, different, or creative.

Most photographers using light cubes usually create flat lit subjects floating in a featureless void that is good for web product catalogs. This technique is also good for quick through put, not creativity. Whereas the studio photographers that built a custom set with complementary backgrounds, specialized product support and lighting designed to best showcase the products details always made the product appear more valuable and worthy of a hi-end catalog. 

I’ve found over the years by doing it the hard way that even if I fail in a studio set-up I always learn something valuable that improves that “shoot” and others in the future. 

So, here’s my super shiny target pistol as a nice example of a difficult reflective subject…


 f13.0 @ 1/125 sec., ISO 400: Lens @ 170mm
And just to make it more difficult I placed the pistol on Mylar over a rough surface!

Background & Mylar:
  • I chose one of my hand painted, brown tone muslins, because it went nicely with the grips on the pistol.
  • I used the Mylar for two purposes:
  •         1) The Mylar reflects the background giving me a foreground and base that color matches
  •              to the background exactly.
  •         2) The Mylar also gives me kicker reflections onto the underside of the pistol’s barrel.
Here’s my lighting set-up….

Front View
The only thing different here is the background change-out for the photos of a rifle. As you can see I only used ONE LIGHT and a REFLECTOR!

Main Light:  A Larson RS 9”x24” Strip-light
Reflector:  A Photogenic 40”x40” Sil Foil Reflector

Here is a side view of the lighting set-up…

Lighting Side View

Important:  This is the most critical illustration of my set-up as it shows the Direction of the main light and its Relationship to the reflector.

NOTE:  That the main Light is NOT Pointed Directly at the gun; It’s pointed at the reflector.  Or, more precisely, my overhead main light is aimed so that tis trailing edge is just missing the top edge of the gun. This is why the modeling lights on professional studio flash units are so valuable. In a darkened studio the modeling lights on each flash head tell you exactly where each light is pointed showing us its effect.  In this case I merely tilted the overhead main’s soft box down until I saw its light hit the top edge of the gun and then tilted it back up just enough to miss its directly illuminating the gun. Why? If you point your main light at the highly reflective subject the highlights created will all just blow-out, and blown-out highlights—especially with digital cameras—are not recoverable.

Background Light:
To illuminate the backgrounds for these gun photos I tried something different. I used back lighting instead of the usual front lighting often used in the studio.  Why?
  1. I wanted a softer, lantern like, look to the background.
  2. Without front lights and their stands my walkway behind the prop table was cleared so I could more easily have access to make these adjustments to the main light and the guns.
This shoot-through technique worked really well, but because theses hand painted muslins are so thick I did have to use one of my photogenic 500 watt second power lights at nearly full power to be able to use f13.0 for my aperture; and than I had to go to 400 ISO to get the exposure I wanted.

Getting the Light on the gun:
The position you see of the silver reflector in front of the table is not exactly where it was as I took the images of the guns.  I had to minutely adjust the tilt of the silver reflector for each gun or knife as I watched the reflection of the overhead main light on the front surface of each gun.

Hope you enjoyed….’Til next week…

Author:  Jerry W. Venz, PPA Master Photographer, Craftsman
Training site:  http://www.LightAtTheEdge.com
Client site: http://www.TheStorytellersUsa.com

Tuesday, February 27, 2018

NATURAL LIGHT EQUESTRIAN PORTRAITS IN THE BARN


When we do portraits of horses and their owners we often start them in a barn or out building.
This serves two purposes:
  1. If we’re starting photography at a less than ideal time of day when the light is flat, and thus directionless, we use “barn light” to create dramatic portraits.
  2. These interior portraits give our clients additional choices with a really different look than the outside portraits; and that usually gives us higher sales!
For some reason I rarely see other photographers use barns properly for equestrian portraits with their owners. These photographers often put the horse and owner IN the barn’s doorway using it as a framing device. Then with their subjects facing the outside or inside of the barn all they get is Flat Light!

My basic rule:
  • For interior barn portraits the barn is Not the Subject the barn is the Light Source! 
  • And just like studio or window light portraits I do not photograph my Light Source; why? Including the light source in your portrait will only create a large, over exposed, distraction that you never want in a low-key portrait.
The open door of a barn creates a light that is just like a large window, which is probably the Best light for portraits. And just like the light from a window barn door light is softer near the opening and harder as you move your subjects deeper into he barn—provided there are no other light sources in your barn.

I usually place my subjects from 1/4 to 1/3 of the way into the barn—depending on what I find as a background for my subjects…


f8.0 @ 1/250 sec., ISO 400; Lens @ 50mm - You don't usually see me at 50mm, but this was a really small space!

I’m extremely picky about my portrait backgrounds and will only allow tools or tack on the background walls if they’re not too distracting. I prefer the simplicity of nice bare barn wood like the above portrait of this hight school senior with her old horse.

NOTE: Just like the I do window light I do not allow the use of barn door light if there is Direct Sunlight flooding the opening. I only want Sky Light on my subjects!

Don’t hesitate to ask if you have questions….’Til next week…

Author:  Jerry W. Venz, PPA Master Photographer, Craftsman
Training site: http://www.LightAtTheEdge.com
Client site: http://www.TheStorytellersUsa.com

Tuesday, February 20, 2018

FINE ART BARN WOOD PHOTOGRAPHY


I’ve been doing photography of the barns in Idaho ever since we arrived here in the Treasure Valley (Boise, Idaho area) back in 2009.  Creating fine art images of these vanishing beauties has become a passion and a duty especially since development has started again at a break-neck-pace. It will soon be the case that all the barns will be gone near any developed cities here in the Treasure Valley just as happened in California. Where we came from in Silicon Valley (Northern California) there were only a couple barns left that were once surrounded by vast orchards replaced long ago with housing developments and High Tech corporations.

In this blog I’ll be focusing on barn details highlighting great old barn wood textures and colors. This is one of my specialties when I do any outdoor fine art photography and as I’ve said in other blogs: “You can often reveal more about a subject by showing less of it.”

 f10.0 @ 1/60 sec., ISO 800; Lens @ 60mm

This big old barn (circa 1905) in Nampa, Idaho, is an arched roof type barn; one of my favorite types. Since its still got some old paint on it I kept this image in color and zoomed-in on those three marvelous windows.  Done this last December on an overcast afternoon the soft light lowered the contrast and kept the white highlights in check. I’ll be returning to this barn soon!

NOTE: Don’t forget the “outbuildings”!

Most farms have numerous smaller out buildings in addition to a barn. Sometimes the outbuildings are in worse shape than the barn and that condition makes them ideal for detail images! This outbuilding is nearby that barn I just talked about….

 f8.0 @ 160th sec., ISO 800; Lens @ 100mm
This is a chicken coop apparently constructed with reclaimed boards that have weathered nicely. I love the mix of colors, the textures and especially those random imprinted letters!

Another nice outbuilding….
f13.0 @ 1/400 sec., ISO 400; Lens @ 170mm
This outbuilding is on a property in Eagle, Idaho, near a barn I’ve been photographing for several years. This old outbuilding is skewed because it’s leaning; it may not be standing much longer. So, naturally it’s become one of my favorite subjects! This structure became an obvious choice for a Black & White conversion since it has no paint left on it. What drew me to this crop (by zooming my lens to create this composition) was that I could see through the building looking out the chicken wire covered smaller window with that large weed giving me a secondary center-of-interest. I like to have layers of interest in my fine art images.

’Til next week….

Author:  Jerry W. Venz, PPA Master Photographer, Craftsman
Training site: http://www.LightAtTheEdge.com
Client site: http://www.TheStorytellersUsa.com

Tuesday, February 13, 2018

FINE ART PHOTOGRAPHY; SHOWING LESS CAN REVEAL MORE!

Photography of old and ancient things—either man-made or natural, has been an artistic passion of mine for over 40 years. So, as such, I really don’t do “documentary photography”; that is straight-up, backed-off, un-manipulated pictures of things just as I found them. I call that a “record-shot” and I only do those to accompany one of my blogs or as a teaching tool for my students. 

As artists we interpret the world, we idealize our subjects, showing our audience a different point of view. Sometimes we push that vision to an alternate reality. The problem with the record-shot is that it’s too literal. You instantly recognize the thing that it is and move on—no thought process required; Boring!  I’m not afraid to produce an image that most people can only guess its source.  I like to make people think. However, I’m not talking about pure abstract images—I’ve been known to do those as well! Pure abstracts are too easy especially in the digital realm. No, I’m talking about something more subtle; using my vision of parts of an object to hint at its whole.
f11.0 @ 1/100 sec., ISO 400; Lens @ 24mm
When I find a worthwhile subject I like to start with close-ups. I’m looking for the details that tell us about its nature—its history—how it has weathered time. I tell my students, “showing less can often reveal more about the object!”

Then I start showing more…
f20.0 @ 1/160 sec., ISO 400; Lens @ 24mm
This is a reverse angle from within my subject using wide angle distortion as a compositional effect; the leading lines of its structure pointing back to that colorful wall.

Then backing out, the way I came in, to reveal the other side—the entry way sans door.
f8.0 @ 1/1250 sec., ISO 400; Lens @ 35mm
I had pre-visualized this exact image of this subject years before with those fall colors visible through this doorway, but was never able to coincide a visit here during the fall along with great lighting, at the same time!  

And finally the reveal of my subject as a “record-shot”….
 f8.0 1/200 sec., ISO 400; Lens @ 67mm
This is an old Basque Sheep Herder’s Wagon on display at the Idaho Botanical Gardens (Boise, Idaho). 

So, that is my artistic process for photography of most objects. I carve up my subject—often with telephotos as my knife—dissecting the subject to show its details. Sometimes I don’t even show the whole subject—that’s what too many other photographers do all the time!

’Til next week…

Author:  Jerry W. Venz, PPA Master Photographer, Craftsman
Training site:  http://www.LightAtTheEdge.com
Client site: http://www.TheStorytellersUsa.com