Tuesday, February 28, 2017

DRAMATIC LIGHTING IN NATURE PHOTOGRAPHY

I tell my students that if you don’t see shadows in a scene you’re there at the wrong time—come back later or earlier. I won’t even take my camera out of my camera bag if the light isn’t dramatic…that just happens to be my style.

Once I’ve decided where I’m going and what I’m going to photograph—and it does not matter if it’s nature or travel photography—then it’s all about the when. The when is not just about time of day—basically having the sun low in the sky since the drama is at sunrise or sunset—there’s also the time of year. I’ve always avoided most national parks when the tourists visit them (summer to early fall), so I go to the really popular national parks in late fall to early winter; often late November.

Not only do I not go there when the tourists go there I do my photography when they don’t and I use different tools and techniques to create unique dramatic images. 
Petrified Sand Dune, Devil’s Garden, Arches National Park; lens: 16mm fisheye
The lighting of the low setting sun here is creating very dramatic backlight and side light on the monoliths and showing nice texture on the petrified sand dune in the foreground. Wanting to go in close to fill the foreground with this large sand dune the 16mm fisheye was the only choice as its angle of coverage is 180 degrees. In addition, I kept the inherent distortion to a minimum by keeping the horizon line as close to the middle of the frame as I could.

This next image of the iconic lower Yosemite Falls taken a very cold winter morning not long after sunrise.  I wanted to capture the triangle of ice/snow on the face of the falls….
Lower Yosemite Falls; Lens @ 200mm; on Kodachrome 64 film
Many tourists miss this view because they don’t go out early enough—the ice/snow on the face of the falls melts away rather quickly in direct sun light. I got out there early enough that the sun was off to the side making shadows and creating nice texture in the rock face.  Most tourists seeing this later in the day just get pictures of the falls in flat light.

So, my basic rule in nature photography, if you want Great Lighting, is to be there First or be there Last!

’Til next week….don’t forget if you have questions don’t hesitate to ask…

Author:  Jerry W. Venz, PPA Master Photographer, Craftsman
Training site:  http://www.LightAtTheEdge.com
Client site:  http://www.TheStorytellersUsa.com

Tuesday, February 21, 2017

LENS CHOICE IN THE ART OF PHOTOGRAPHY; PART 3

Using Unusual Focal Lengths

This is so important I’ll repeat what I said in Part 1, “The Focal Length you choose is the most important artistic decision in photography.”

The focal length you choose:
  • determines the artistic canvas (how much is seen).
  • determines the perspective.
  • determines the composition.
  • and determines what kind of distortion (extension-wide angle or compression-telephoto) will be used, if any.
All things being equal—you nail your exposure and have your lighting under control—creative choice of Lens shows your audience (literally) your vision, or interpretation, of the world. And isn’t that what art is all about? Photographing things exactly as they are is merely reportage; anyone can do that. That’s why when I undertake the challenge to photograph some iconic thing that has been photographed millions of times I must do my best to create something original.

So, when I was planning our vacation to Italy in 2004, with a stop in Rome, and our hotel only four blocks from the Colosseum, research and planning to photograph the ultimate Roman icon was a priority. Googling the Roman Colosseum produced an endless series of pictures, of course, of the whole thing. Hundreds and hundreds of images of the Colosseum centered in the frame just sitting there.  Amazingly many were taken in broad daylight depicting a dull gray, butt ugly, sad structure!

Planning: 
Knowing this was to be a night-shot I bought a compact tripod that would fit in my luggage along with an umbrella (we were going in May). Doing research I found that Nikon’s 20mm, f2.8, was one of their sharpest lenses, so I bought one! I didn’t yet own a fisheye for my digital cameras then, but I’d already decided that I did not want to distort the Colosseum that much.  

This is my version of the Colosseum at night…
f22.0 @ 4.0 sec., ISO 800; Lens - 20mm
The 20mm lens was perfect for taking a vertical slice of the structure. I did a two way tilt pointing up and over to tilt the structure creating diagonal lines that point to the vanishing point created by the cars, streaking red, taillights. I was happy it rained (Kathi held the umbrella over head to shield the lens) making the street nice and reflective.

Next I went to work slicing-up the Colosseum with my 24-85mm zoom getting some nice detail images, again mostly verticals, that hardly anybody does even today.

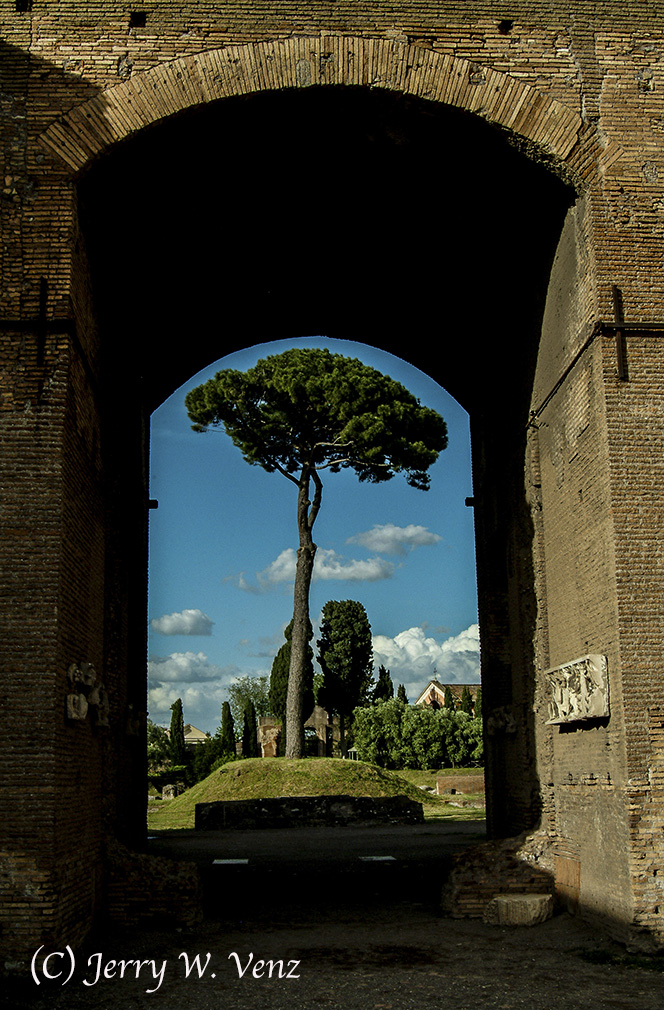
Another vertical slice of a Roman structure…
f13.0 @ 1/350 sec., ISO 400; Lens @ 24mm
This was up on Palatine Hill towards sunset. I couldn’t resist the alignment of the tree and the archway as I moved-in close with my lens at 24mm.  

I’ll wrap-up with something very recent. Here in Idaho we’ve just had a record setting winter with more snow on the ground than ever recorded in Boise. Coupled with low temps. from -2° to -8° F, with melting in between, we’ve also had lots of great icicles! 
f5.6 @ 1/2000 sec., ISO 100; Lens: 15mm
Warping my front porch with my fisheye lens, I wanted it to look like a mouth full of wicked teeth! Putting the setting sun directly behind the longest icicle (it’s about 3 feet long) created nice backlit detail in all the icicles.   I’ve been having sooooo much fun here this winter!

So, as you can see I like my lens choices at each end of the focal length spectrum. I tend to avoid the boring middle. Try it, you’ll start to see differently using extreme focal lengths.

’Til next week…show me some of your experiments…I’d love to see them.

Author:  Jerry W. Venz, PPA Master Photographer, Craftsman
Training site:  http://www.LightAtTheEdge.com
Client site: http://www.TheStorytellersUsa.com

Tuesday, February 14, 2017

LENS CHOICE IN THE ART OF PHOTOGRAPHY; PART 2

The Telephoto Lens in Portraiture and Art

When doing portraits of people—especially when they are Paying YOU—it’s important that they not be unattractively distorted. In portraiture I also use distortion, but it’s the kind that makes people look good—especially groups—Compression Distortion. This is the speciality of telephoto lenses.

I don’t use Wide Angle Lenses for traditional portraits because for adequate head sizes, using a wide angle lens, you must move in close to the subject(s), which causes very unattractive extinction distortion—especially in groups. All lenses distort in some way—but this type of distortion where the closest part of your subject to the lens becomes unnaturally larger happens naturally with all lenses, however, short lenses will amplify this effect. In group portraits where you have two or more rows of people a short lens will increase the head sizes (and body mass) of those in front and decrease head sizes of the people behind. To control this distortion I use the most telephoto I can given the room I have on my location. Telephoto lenses force you to back away from the group and the perspective change equalizes head sizes front to back. 

My Go-To Focal Length for Portraits
Groups: 135mm to 150mm
Individuals: 200mm to 300mm

You may ask, What is a Wide Angle Lens?  I consider 50mm and anything wider pretty much off limits for traditional portraits. I don’t even own a 50mm lens and haven’t had one for over 40 years! I did have one of the fad 85mm, f1.2, lenses for a year (when we were doing weddings) and sold it finding it merely a wimpy telephoto. When I want telephoto I usually want 200mm or more!


The other affect the telephoto gives me, that a  “normal” or wide angle can’t is good depth-of-field, at wider apertures, while also creating nice out-of-focus (Bokeh) backgrounds.


f5.0 @ 1/400 sec., ISO 400; Lens @ 200mm
Here I have three subjects in layers (a near horse, the girl, and a horse behind her) and because I’m really backed-off, using my 200mm lens, the relatively wide aperture of f5.0 is giving me enough depth-of-field for this group and still knocking my background nicely out-of-focus.

Portraits of Individuals

My priority is always creating enough depth-of-field on all portraits to keep every persons’ entire head sharp. I find it distracting and unnatural when I see a portrait where the person has only One Sharp Eye or if the mask of their face is sharp, but their ears are soft because the photographer used too wide an aperture (like f2.8, 1.4 or 1.2) and made it worse by using a 50mm or wider lens!


Therefore, my preferred aperture on individuals is f4.5 to give me adequate depth-of-field, which when used with my lens at 200-300mm will still give me good background “Bokeh”.


f4.5 @ 1/200 sec., ISO 800; Lens @ 200mm
As you can see she’s completely sharp because I’m backed-off using my lens at 200mm, which gives me more depth-of-field than if I was in close using say a 50mm at the same aperture.

TECH NOTE: Did you know that by merely backing-up 10 feet you can Double your depth-of-field?

Great Bokeh at Small Apertures?

Getting great Bokeh is about more than just using wide apertures. In fact, you can get Larger Bokeh circles with more telephoto, at the same aperture, than with a “nifty-fifty”. Bokeh is more about the distance between your subject and the background. Keeping your subject, say 20-30 feet, away from their background is what defocuses everything so nicely. 

NOTE: If you want really great Bokeh always have your background Back-Lit. Specular highlights in the background make the best Bokeh.


f8.0 @ 1/1000 sec., ISO 400; lens @ 200mm
Great Bokeh at f8.0 is possible with a longer lens (in this case 200mm). In addition my telephoto’s compression effect is pushing my subject (the leaf) into the background and yet there’s great separation between the two elements because the background is so defocused.

Telephoto for Landscape?

Aside from Ansel Adams there have been few photographers that could pull-off the huge landscape with a wide angle lens. And even then it took a genius in post-capture manipulation to make it work. So, what’s left for us mere mortal photographers to do?  I do pieces of landscapes; I carve-up scenes with my telephoto often taking vertical slices of the usual horizontal view.

f9.0 @ 1/250 sec., ISO 800; lens @ 200mm
In this image, taken from our balcony, on one of our cruises, in the Caribbean the clouds over the sunset were the best compliment to that orange ball sinking into the ocean. So, I went vertical for a more dramatic composition. 

In Part 3 I’ll show some creative wide angle (still slicing up scenes!) of architecture and icicles as art. ’Tis next week…

Author:  Jerry W. Venz, PPA Master Photographer, Craftsman
Training site:  http://www.LightAtTheEdge.com
Client site: http://www.TheStorytellersUsa.com

Tuesday, February 7, 2017

LENS CHOICE IN THE ART OF PHOTOGRAPHY; PART 1

As an artist the lens you choose shows your audience, literally, your vision or interpretation of the world. Being creative often means breaking the rules (I make my own rules) or at least not doing what everybody else is doing! Too many photographers are just copying what others are doing; often copying bad habits.

I often read that experienced photographers suggest this or that focal length lens is best for photographing a certain subject. Or even more bizarre that “artists should be using prime lenses only!” REALLY? That may have been true 50 years ago (I remember that era having begun my photography then), but not for the last 20 years as our computer designed zoom lenses have excelled. The nature purists say we should not distort nature or that the portrait lens of choice is the “nifty-fifty” or the 85mm (and you must have the f 1.2 version) to create good bokeh. Hogwash—These “rules” or popular fads in lens choice are creative killers! 

In the image below, because my subject (Delicate Arch) is such an iconic subject, I set-out to do something really different….
Delicate Arch: Lens: 16mm fisheye; Film: Kodak 35mm Ektachrome Infared (EIR) with an 056 (Orange) filter
Everybody photographs Delicate Arch from the other side (I’m on the cliff side!) and they always photograph the whole thing—a literal translation—boring. So, I’m inside the arch and with a fisheye lens, that sees 180°, I turned away from the right leg of the arch to omit it from the composition. I wanted the one leg and its shadow joining with the rest of the arch’s shadow to imply its presence. In addition to minimize distortion I kept the horizon line in the middle of the frame. If you want to maximize distortion with a super wide angle lens you place the horizon line either above or below the horizontal center line of your frame. Not content with this radical presentation I used Infared color film with an unusual (056) filter color (everybody used a yellow filter back then) to make my sky green. Before photoshop we had to be creative in different ways!

I usually don’t decide what focal length lens I’m going to use, when doing nature, until I’m standing in front of the subject. Then that’s usually the First decision I make followed by the Aperture/Shutter speed and the ISO I need to get there.

I believe that the focal length you choose is the most important artistic decision in photography—and to quote Ansel Adams “where you stand”, relative to the subject, is right up there!

The focal length you choose:
  • determines the artistic canvas (how much you see).
  • determines the perspective.
  • determines the composition.
  • and determines what kind of distortion (extension-wide angle or compression-telephoto) will be used, if any.
Speaking of distortion—how about breaking a portrait “rule” by using a fisheye lens….


f8.0 @ 1/500 sec., ISO 400; lens 15mm fisheye
In this image I actually increased the extension distortion by tilting the camera up (putting the horizontal line very low in the frame) creating the “bowl effect” and wrapping the trees around my subject. Note that the guy is not distorted because I kept him in the middle of the composition.

Using Perspective Distortion Creatively…


f5.0 @ 1/30 sec., ISO 1600; Lens @ 24mm
A classic use of wide angle is to highlight a foreground feature with your wide angle lens that leads you into a more distant main subject—an often cliche, nature, composition. Here, using my zoom lens at 24mm, I made my center of interest the foreground object and because it was more interesting (I like the purple mid-way lights on the clown’s face!) I moved-in close to the painting making it really dominate my frame using the lens’ distortion.

As you can tell I really like very wide angle lenses!  In Part 2 I’ll go into lenses for portraiture and other creative uses for portrait lenses.

Author:  Jerry W Venz, PPA Master Photographer, Craftsman
Training site: http://www.LightAtTheEdge.com
Client site: http://www.TheStorytellersUsa.com

Tuesday, January 31, 2017

MANUAL MODE; THE ART OF PHOTOGRAPHY PART 5: WRAP-UP

Having discussed and illustrated the value of using the camera in Manual Mode I return, full circle, to my question at the beginning of this series.  Are YOU an artist if you do’t use the “M” mode?

Well, as long as you stay out of the “P” mode you can still be an artist if you did have an original idea, executed it in say aperture priority, and you did achieve the result you pre-visualized.  What I’m trying to impress on photographers is that like painters we should control all the variables that effect the final image for us to truly be the authors of our images. I believe those that just select the “P” mode, push the shutter button, and settle for the result are very close to those “artists” who used those paint-by-numbers kits in the past. 

I always have, and still pick, every variable that goes into my art because there’s always a reason behind each choice. There’s always a reason I pick a certain ISO/f-stop/shutter speed combination. Maybe the above is one definition of an artist: And if you have no reason to (or lack the ability to) pick the fundamental components that affect the final image then…You’re NOT yet an artist in my book.

Here is an example of picking every variable to create the image I had pre-visualized, in this scene, at our State Fair….


f25.0 @ 1.6 sec., ISO 400; Lens @ 20mm
Part of my pre-visualization here was bringing a tripod with me for the time exposures I had planned! I’ve been asked by my students, “What do you pick first when you set-up the shot?”
  1. Usually Focal Length is the first decision I make. The focal length you choose is the most important artistic decision in photography!
    • It determines how much is seen.
    • It determines the perspective.
    • It determines the composition.
    • It determines what kind of distortion (extension or compression distortion) will be used, if any.
  2. After the base line metering of my light, for basic exposure, I pick my ISO. For this scene I did not want the super high ISO because I knew there would be a lot of night sky in my image that would be underexposed thus creating a lot of noice.
  3. For this image Shutter Speed was the most important creative, exposure variable. I wanted that ferris wheel to be a vibrant piece of spinning art! But, at the same time I wanted detail in it. I’ve never been a fan of when photographers hold their shutter open so long the the ferris wheel is just a blurry, bright, blob.
  4. And for this image, because I included a large piece of foreground (using its “lead-in lines”), using that fun-house building, I knew I needed a lot of depth-of-field to keep everything sharp. Therefore, I needed a small aperture.
I think my lens choice and where I placed my camera made this image. By being closer to the funhouse building, with my lens at 20mm, the wide focal length’s extension distortion warped the lines of the building making it point into the ferris wheel. In addition the placement of the ferris wheel, in my frame, using the compositional rule of thirds made this image different and, I think, more interesting than a ferris wheel all by itself.  So, as you can see there was a lot of thought behind this image—as well there should be! 

My challenge to you: Pick something, like the ferris wheel, that everybody photographs and put your own spin on it (pun intended!). 

Do it differently….Show me your results! And, Stay in the mode of “M” !

’Til next week…

Author: Jerry W. Venz, PPA Master Photographer, Craftsman
Training site: http://www.LightAtTheEdge.com
Client site: http://www.TheStorytellersUsa.com

Tuesday, January 24, 2017

MANUAL MODE; THE ART OF PHOTOGRAPHY PART 4: SHUTTER SPEED

Your camera’s shutter speed, especially at its extremes of very fast—say 1/8000 of a second—can stop the fastest things man has made. And by using very long exposures, such as 30 seconds or more, your camera can gather enough faint light to reveal tens of thousands more stars than you’ve even seen before. This ability to choose shutter speeds that can reveal things the human eye alone cannot see gives us a tremendous artistic tool. 

ACTION PHOTOGRAPHY:

When dealing with action most amateurs usually just go to a fast shutter speed and freeze the subject and that’s fine. It’s easy to do, but after a while these “action” images all look the same. 

My philosophy on action photography, having done all kinds of sports photography for these past 40 years, is to only freeze extreme action at peak moments and to imply motion with the slow shutter speed (probably the most artistic use of shutter speed) when I can.

When do I use fast vs. slow shutter speeds?

Two factors determine this: the Speed of the Subject and (very important) Direction of Travel relative to your camera. Subjects that are moving across your film plane (or Perpendicular to your lens axis) are the ideal subjects for using a slow shutter speed (1/60 sec., or slower) while you pan your camera following the action as the subject speeds by. This takes practice and the slower the shutter speed the harder it is to do, but the results can be very artistic…

Title: Warped Speed — 1/60 sec., f16.0; ASA 125
This image of (King) Kenny Roberts I caught, at the San Jose Mile, in 1971 on Plus X (B&W) 35mm film. At the speed he’s going (about 120mph) I was comfortable using 1/60 sec., and knowing that he and the motorcycle chassis would be sharp, but the wheels would empty out (not freezing the spokes) and the background would streak nicely.  

Then two more steps followed:
  • I hand toned (Edwals Print Toner) the B&W print.
  • Then I “scanned” that 8x10 print using a Kodak color copier to intensify the red followed by a Stretch Mode that egg-shapped the bike’s wheels giving me my “Warped Speed” effect!
You see there were creative possibilities of this nature BEFORE Photoshop. I guess I was ahead of my time since this image won awards in PSA (Photographic Society of America) print competitions and later in National awards at PPA (Professional Photographers of America) convention.

Subjects Traveling Towards or Away from you:

Subjects speeding directly towards or away from your camera can be stopped at a much slower shutter speed than those subjects moving across your “film” plane. Here’s an example…

1/500sec., @ f10.0 ISO 400
I probably could have stopped the boy with a much slower shutter speed here because he was slowing down (at the end of the slip-n-slide) but the water that he was pushing was accelerating and I wanted the water to look solid.

Freezing Peak Action:

When photographing extreme action that is un-predictable such as a rodeo (I call this Chaotic Action!) there’s not as much opportunity for panning, so I usually use high shutter speeds and look for unusual peak moments.  Because rodeo’s action is so intense and unpredictable I use even faster shutter speeds than I do in motorsports.

Talk about chaotic action….

1/2500 sec., @ f5.0, ISO 800; lens @ 200mm
As I said earlier in Part 2 (ISO) of this series, I used the ISO I need to get me to the f-stop/shutter speed combination I want. Bumping up my ISO to 800 was necessary to use 1/2500 sec., and at f5.0 I’m not stopped down much. However, with my lens at 200mm I got plenty of Depth-of-Field because I was backed-off quite a ways.

Slow Shutter Speed Pans:

I’ve always been disappointed when I’ve seen photos of race cars or motorcycles (or any motorsports) on the race track looking like they were parked there because the photographer did the lazy thing and just used a high shutter speed—Boring! Enter the practiced art of panning with your subject at slow shutter speeds.  

I discovered many decades ago that panning worked best in motorsports (or any sport on a track) where the action is predictable. To get a high yield in panning action you need to know the direction of travel of your subject and where they’re coming into your frame and leaving, so you can smoothly follow through as you rotate your body following the action.

Here’s one with a pretty slow shutter speed…

1/15 sec., @ f16.0, ISO 400

My panning rotation is nearly 180° from when I first see the racers coming towards me. Then I click the shutter when they are at the 90° point (directly in front of me), which is their closest point relative to me. I then keep panning (the follow through) even after I click the shutter. The panning follow through is important—especially a slow shutter speeds like 1/15 sec., as in this image—because the pan creates the horizontal lines and streaks in the background. And, to make those lines and streaks smooth and straight across the image you need to keep the camera moving the entire time the shutter is open.

My pans of race cars and motorcycles are usually at 1/60th or 1/30th sec. for a nice crisp subject. Using 1/15 sec. yields a more radical, artistic look because you get some “juggle—blur” in the subject as seen here because these flat track bikes are on a dirt track and are sliding and bouncing as they approach a turn at 100+ MPH!

LONG EXPOSURE NIGHT SKY PHOTOGRAPHY

The following image is combining Light Painting with Motionless Stars (the Milky Way). When doing this I want two things:
  1. Enough time to do my light painting (with a flash light).
  2. I want the star field to be sharp, appearing motionless and NOT Streaking.

To do this you need a very wide angle lens (that’s pretty fast-like f2.8) along with a long shutter speed and a pretty hight ISO!

The best formula I’ve seen to determine the longest shutter speed with a given focal length for the best image quality is: 450 divided by the lens focal length (in millimeters) equals the longest exposure time in seconds for that lens. It worked; here are my results…

 30 sec., @ f2.8 ISO 3200; Lens 15mm
So, with my Canon 5D MK II using my Canon 15mm f2.8 Fisheye lens the calculation is: 450 ÷ 15 = 30 seconds.

That calculation will only give me the TIME I need and SHARP STARS and NOT the proper exposure for the scene.  That YOU must work out based on what your camera’s imaging quality is at high ISO’s and the aperture you want to use.

NOTE: This formula is only exact for Full-Frame, 35mm format. If you’re using an APS-C sized camera sensor, with its narrower angle of view, you much reduce the shutter time. (See link at the end of this article for everything about night sky photography.)

As you can tell I really have fun with Extreme shutter speeds in my fine art. I urge you to push the boundaries of your artistic tools and create art!

The next part in this series will be a wrap-up…’Til next week…

Site Info Mentioned Above:  http://www.intothenightphoto.blogspot.com


Author:  Jerry W. Venz, PPA Master Photographer, Craftsman
Training site:  http://www.LightAtTheEdge.com
Client site: http://www.TheStorytellersUsa.com

Tuesday, January 17, 2017

MANUAL MODE; THE ART OF PHOTOGRAPHY PART 3: APERTURE


An artist decides what is important on his canvas and emphasizes that—“the center of interest”—over the other supporting elements in the scene.  The painter may do this with color, perhaps using a brighter color or with more directional, dramatic, lighting on his main subject. The painter may paint his main subject with sharp detail and obscure or mute detail in the background. 

It is our job as an artist to direct where the viewer looks in our images. The way we do that in photography is with what is sharp against what is un-sharp (out of focus). 

We create that with our point-of-focus and depth-of-field, which is controlled by the aperture we choose in concert with the lens focal length we pick.

These choices are the most important artistic controls we have in photography.

The core problem with the camera’s Auto Modes (don’t even get me started on the “P” mode!) is that the camera does not know what it’s being pointed at; it does not know what the subject is. Therefore, it can’t know the best f-stop/shutter-speed for that subject—just like ti could not automatically pick a focal length for your zoom lens! 

What aperture to use and why?

Forty plus years doing artistic photography (30 years as a full time professional) has taught me that each artist settles on favorite apertures, that suits their style, based on what the subject is.  In addition I will change my aperture if my subject’s orientation to my camera changes…
f2.8 @ 1/250sec., ISO 800; lens @ 200mm
My preferred aperture is f4.5 when doing portraits of individuals. Why? I’ve found that it’s the best aperture to maintain sharpness in BOTH eyes in a 2/3rds view of the face, while still creating a nice shallow depth-of-field (using my 200mm lens) that will knock the background out of focus for some nice Bokeh. 

However, in the portrait above of the boy, he started exploring and went into profile so, not having to worry about that far eye, I went to f2.8 (bumping the shutter speed up to maintain correct exposure) to really enhance my background Bokeh. 

And, just to show you that you don’t need really wide apertures to get good Bokeh…
f5.6 @ 1/125 sec., ISO 400; Lens @ 200mm
Bokeh is mostly about focal length and distance between the subject and the background. In my fine art images depth-of-field is often more critical especially when I move in doing close-ups of nature—since as you move closer to your subject (at the same f-stop) your depth-of-field DECREASES
f6.3 @ 1/250 sec., ISO 400; Lens @ 82mm
In this detail of the Ice crystal laden leaves of a weeping willow I wanted as much depth-of-field as I could get while still keeping the background (that same tree) soft to reduce its busy nature.

Then sometimes I want maximum Depth-of Field…
f11.0 @ 1/640 sec., ISO 400; Lens @ 95mm
In this Black and White art piece I wanted everything crisp and razor sharp because I knew this subject would be excellent in B&W.

In our fine art photography we often build an image in layers; it’s called foreground, mid-ground (usually the subject), and background. This is how we create depth, interest and three-dimensionality

f8.0 @ 1/350 sec., ISO 400; Lens @ 79mm
The sailboat regatta scene had some nice layers that I wanted sharp. Starting with the floating seaweed in the foreground the sunlit boats (mid-ground) and those great boats, lost in the fog, in the background; I used f8.0, focused on the seaweed, to get the foreground and mid-ground both sharp.

Knowing your depth-of-field with different apertures at given focal lengths is important in general, but it’s CRITICAL when doing group portraits.  When I do portraits outside I always try to make my backgrounds as soft as possible to make the people stand out—and if I can get some Bokeh, even better!

So, the tricky part is to stop down just enough, getting enough depth-of-field to cover ALL the subjects—especially when we place them at different distances from the camera for a nice composition. I use f6.3 on many of my single family groups. If the family is large I will go to f7.1 for more depth-of-field.

One of my favorites…
f6.3 @ 1/125 sec., ISO 400; lens @ 115mm
In the above example I know that at 6.3 with my lens at 115mm (I’m Usually at a longer focal length, like 150mm, if I can back-up) at a distance of 25 feet my depth-of-field is 5.47 feet (using my full-frame Canon 5D MKII).

As you can see the creative use of aperture and the depth-of-field it can create (along with lens choice—more on that later!) is something you don’t want to leave up to any Auto Mode.  Do something creative and show me your results! 

Next, in Part 4, I’ll get into creative use of your Shutter Speed.  Fun Stuff! ’Tis next week…

Author:  Jerry W. Venz, PPA Master Photographer, Craftsman
Training Site: http://www.LightAtTheEdge.com
Client Site: http://www.TheStorytellersUsa.com

NOTE: Go to:  http://www.DOFMaster.com and try their easy to use Depth-of-Field calculator for your camera/lens/f-stop/distance combinations. It’s vital information for the professional and very educational for the amateur.