Tuesday, January 20, 2015

WHEN DOES THE STORYTELLING BEGIN?

We do the formal portrait first then the storytelling begins…

A lot of mom's usually want the prim and proper portrait as their priority, so that's where we start.  You don't want the kids playing, and risk messing up their clothes, before you've gotten the "portrait".  So, we took no chances with these two rambunctious girls in their brand new pastel dresses and started by seating them on our wicker bench.

 f6.7 @ 1/60 sec., ISO 400


Hands together in their laps, dresses all neat and smooth--just what mom wanted.  We got ONE of these!  Then the conspiracy began with big sister as the agitator…


Sensing a loss of control, my wife makes suggestions like…how about all these great leaves on the grass!


That got a nice response…So, they gather some leaves…

They throw the leaves in the air…ONCE!  And off they go to explore…


Just to make my job harder they split up.  So…I do individuals of each playing…


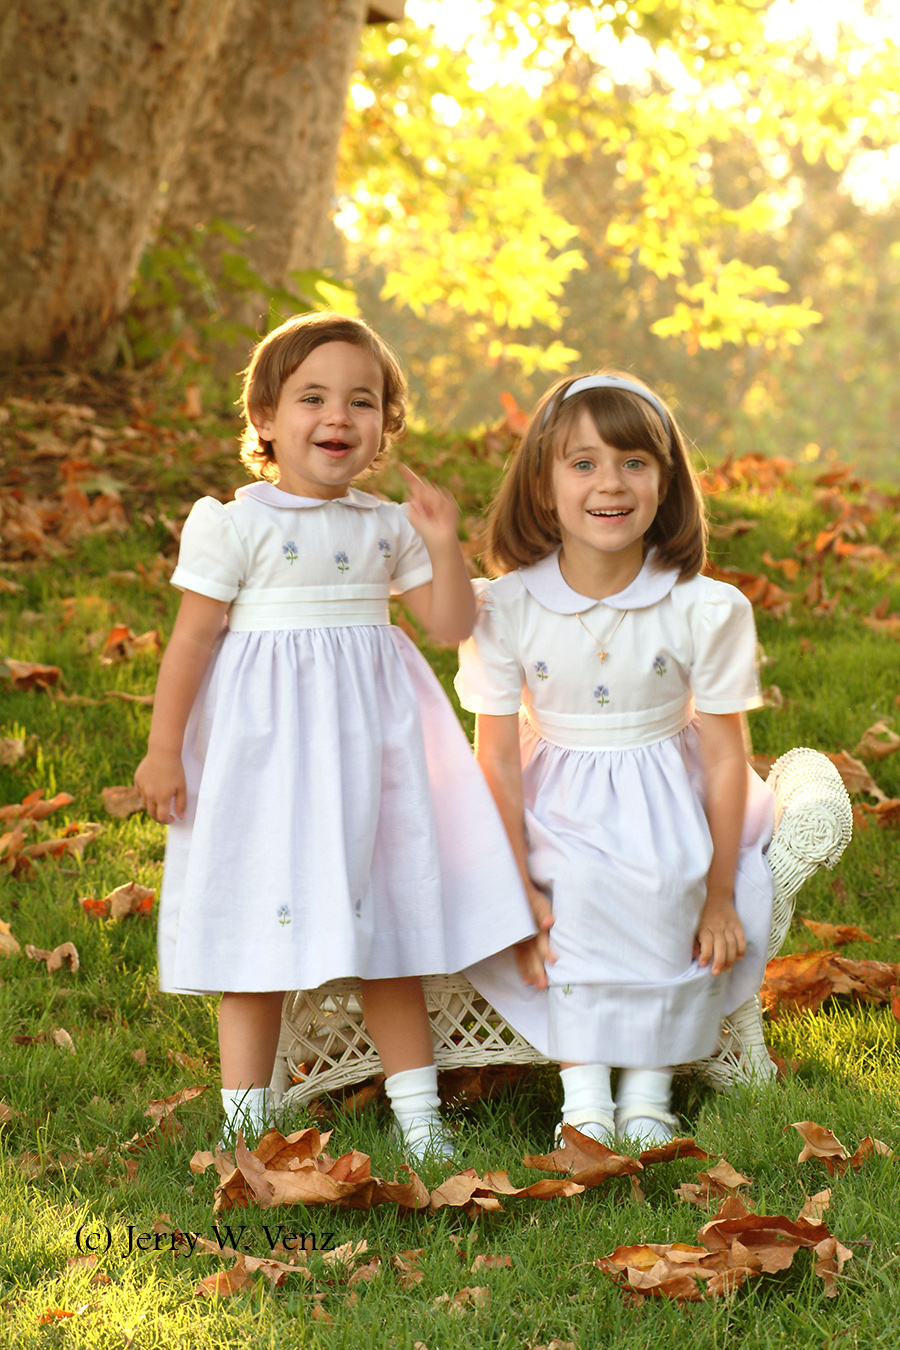
The older girl is open to my "hanging like a monkey in the tree" suggestion!  We finally get them back together when my wife asks them…"did you see the bird in the house?  Let's go see!" That gets them exactly where I wanted them…


I take two images, one second apart, before I realize my aperture is too wide (f4.0) for the depth of field I need for a twosome. I bump the aperture down a notch to f4.9 and by then big sister is gone.  I refocus on little sister and get this last image…before she takes off!  According to the metadata the total elapsed time:  15 seconds.

 f4.8 @ 1/125 sec., ISO 400
This award winning image was the result of that last 15 seconds of their session.  The image was photographed with the Fuji S-2 camera!  It was published in the Fuji Annual Portrait Book and that is when we were invited to join the Fuji Talent Team.

The storytelling images are always the most challenging--and the most rewarding to me--but you must do the basic portraits first.  Then go play!

'Til next week!

Author:  Jerry W Venz, PPA Certified Master Craftsman
Training site:  http://www.LightAtTheEdge.com


Tuesday, January 13, 2015

DIRECTIONAL NATURAL LIGHT IN TRAVEL PHOTOGRAPHY

Looking for and using directional Natural light is just as important in Travel Photography as it is in portrait or nature photography.  I want as much--maybe more--drama in my travel images than in my portraits. This was especially so when we went to Italy and I finally got to photograph the famous city of Pompeii--A city literally buried in drama!

So, what am I looking for?  Shadows of course! To find the shadows you often just have to shift your camera position 180º from flat light to get short light like this…
f9.5 @ 1/60 sec., ISO 400
With my camera position on her shadow side I get the nice three dimensional (short lighting) light that creates depth and brings out texture.  In the next image I stood on the opposite side, where most of the other tourists took their pictures--probably because this side was the entrance to this area…
f9.5 @ 1/60 sec. ISO 400
This view has flat lighting making the statue blend more into the wall and it's OK as a "record shot" but not very dramatic.

This next image is one of my favorites from Pompeii and is one NONE of the tourists even saw from this very dramatic angle. I was walking down a street with the other tourists and I stopped to peak over a wall, just because I could; being 6'2" and saw this gorgeous granary in perfect side light!

f4.0 @ 1/60 ISO 400


This is basically window light--the door like opening on the right is narrowing the light--while the wall on the left, acting as a GOBO, is blocking light creating nice shadows on the mill stone.

It's usually easier to find this kind of lighting with interiors near an opening like a door or window or an exterior hall way, but when you venture outside it's more difficult.


When outside I look for anything that is making a shadow. Of course, if the sun is straight up you're out of luck and would have to come back later in the day.

f19.0 @ 1/180 sec., ISO 400
In this image the sun was low enough to create good textures on the left and the walls were high enough on the right to make nice shadows.

That's what it's all about in my world…Shadows and Drama!

'Til next week…should you have questions or comments please don't hesitate to ask.

Author:  Jerry W Venz, Certified Master Craftsman
Training site:  http://www.LightAtTheEdge.com

Tuesday, January 6, 2015

THE BEST LIGHT MONEY CAN'T BUY - NATURAL of Course!

Sometimes when we do one of our Natural Light sessions the best light isn't out side.  In this case the best directional light was inside the client's home.  When I scouted their backyard and the front of their house, the week before, I noticed the sun room with nice big windows facing the backyard and made the mental note to try to fit that location into the session.

On the day of the session, I didn't think I would be able to use their sun room because the weather was coming in fast--the session was scheduled for October 30th.  If we had total cloud cover there would not be enough light to use the sun room at anything but a very high ISO and even then the light would be very flat and directionless.

What I needed was clear blue sky--without the sun--to give me the quantity of light to use my minimum f6.3 f-stop at 400 ISO and a reasonable shutter speed.  And at the end of the session that's exactly what I got!
f6.3 @ 1/80 sec., ISO 400
If you've read any of my previous blogs you may know that I always use some degree of telephoto lens for my portraits.  I Never use a wide angle focal length for portraits!  Well…Never say Never!  Their odd shaped sunroom from the corner that big love seat sat to my camera position in the opposite corner was maybe 12 feet. So, there goes my favorite 70-200mm f 2.8 portrait lens.  On goes my 24-105mm f4.0 lens and then I end up needing to use that lens at 47mm to get proper framing for cropping.  Oh, the horror!!!! 
What saved me was my distance from my subjects.  They look really good because they're very central in the frame.  You can see, however, that the window frame on the right is starting to bend as it goes out of frame.

Even though it was overcast outside earlier we had a deadline to do some editorial images for the cover of River's View Living magazine featuring this family's home.
 f7.1 @ 1/200 sec. 400 ISO, lens @ 105mm


The weather gave us this nice, broad, soft, light in their front yard--not my favorite lighting, but OK for it's purpose.


boy: f4.5 @ 1/400 sec., 400 ISO, Lens @ 200mm  and girl:
f4.5 @ 1/500 sec., 400 ISO, lens @ 200mm

The sky started clearing enough to give us some direction in the light for the portraits of the kids. Now we're back to proper focal lengths for portraits now that I have my 70-200mm f2.8 lens on my camera!

f6.3 @ 1/160 sec., ISO 400, lens @ 95mm
 This is one of the family set-ups we did in their backyard.  They were delighted with all the images, we got some nice images for the magazine, and I relearned that if I'm careful I can produce a nice portrait even with the "wrong" lens.

'Til next week….

Author:  Jerry W. Venz, Master Photographer Certified
Training site:  http://www.LightAtTheEdge.com

Tuesday, December 30, 2014

USING FLASH OUTSIDE WHEN AMBIENT LIGHT IS INADEQUATE

This blog was started to bring attention to the rampant miss-use of flash outside when there's great natural light just begging to be used.  However, there are exceptions to everything and the mark of a real professional photographer is analyzing the quality of light on your subject and then using any and all tools you have to create the lighting that matches the image YOU have of that subject in your head.

The essence of the art of photography, as I see it, is the ability to see a subject and immediately visualize the ideal resulting image.  The ongoing challenge to creating these ideal images are the imperfect tools we are forced to use in our chosen medium.

My latest challenge popped-up, seemingly overnight, in the form of an oddly beautiful mushroom in the flowerbed at my front porch. I had never seen such a mushroom.  With it's translucent pencil thin stalk topped with a small cap with a glossy black ribbed belt--it didn't look REAL. It looked like some plastic imitation of a mushroom.

Well, challenge accepted!

The instant I saw the mushroom I knew I had to Back light it's stalk and Side light it to pick up detail on the cap.  Also knowing that I would have to go in close on this small subject, I would need A LOT OF LIGHT to be able to use a small aperture for the most depth-of-field I could muster--I knew that I had to dispense with the ambient natural light and bring in my portable studio flash unit.  Even though it was still 2 hours until sunset I knew that using flash at a relatively high shutter speed would eliminate all of the ambient daylight as the sun came down right there at the front of the house.  At one point I even had to place a box in front of the mushroom to shield it from direct sunlight.  So, I brought my Norman 500 watt second pack and a couple heads to the porch and set-up a stand with a black velvet drape behind the mushroom.
f13.0 @ 1/125 sec., ISO 400, Lens@ 105mm
This was my first roughed-in image using ONLY a back light with a snoot on it to really narrow my light to a spot source. I metered the flash at f13.0 and just went for it! With the flash pointed towards the camera I got all kinds of little flares, the edges on the cap are over exposed and I've got a green chromatic lens aberration--but I like this one.  The back light picked-up some nice detail in the stalk.

f14.0 @ 1/125 sec., ISO 400, Lens @ 105mm
In this next set-up I turned-on the other flash head, placed to the side, with a Grid inside it's reflector (making the light very directional) to illuminate the top of the mushroom's cap.  The back light is still on as well.  This metered f14.0 at the mushroom with the flash meter pointed at the camera. At that aperture, about 2 feet from the mushroom, my depth-of-field is only ONE INCH.


This was the basic set-up.  You can see the modeling light in the snoot, at ground level, pointed towards the camera.  That was the only flash head used for the first image.

So, I'm not totally dogmatic about natural light, but I still think it's "The Best Light Money Can't Buy" when it's available!  However in special circumstances, like my mushroom images, when you don't have the light, as a professional, you must create it. And just as I prefer in natural light, I want my artificial light to be DIRECTIONAL to create a three dimensional quality.

'Til next week…should you have questions don't hesitate to ask.

Author:  Jerry W Venz, Master Photographer - Certified
Training site:  http://www.LightAtTheEdge.com

Tuesday, December 23, 2014

NATURAL LIGHT PORTRAITS IN THE MORNING

Outdoor sessions in the morning are challenging for a couple of reasons.  First, finding a nice location that has adequate shade and second, working within the limited window of opportunity to use the shade.

Unlike pre-sunset lighting, morning light is good for only a short time and then it just gets worse--it goes to flat, harsh, cold (color temp) light.  However, I needed a morning location for calendar overflow (and days where it's just too hot) when we have all the pre-sunset time slots booked. 

Surprisingly I found a nice location in the common area of our development, only a block from our home!  The grassy area has four large weeping willow trees that make good shade, but during the summer our time frame for that shade is 8:30am to 9:30am and then it's done.

As I've said before in my blogs the problem with doing outdoor portraits isn't that there's too little light--it's that there's too much light!  With morning light that problem is worse since as the sun rises the light increases! So, the obvious answer to this dilemma is to subtract light from one side of the location using a gobo--black flags--to create something other than flat light.
f4.5 @ 1/250 sec ISO 400, Lens @ 200mm
Here Mary is sitting on one of our posing rocks under the shade of the weeping willow at 9:10am.  The gobos are at camera left.  Sky light is illuminating her face as the sun rises behind her.


This is our typical set-up at this location.  Look around those black gobos and you'll see what I'm blocking.  As the sun comes up on camera right it also lights-up that big field on camera left creating a secondary strong light source.  Without my gobos here I would only get flat light.


In this back view you can see the relationship of all the elements in our "set". You can also see that this is no longer a good time for portraits--the sun is now hitting the rock--it's after 11:00 am.

A few weeks later we booked a large group portrait for this same location at 8:30am.  I used the same gobo set-up knowing full well that the results would be less successful on such a large group…

f6.3 @ 1/125 sec, ISO 400, Lens @ 85mm
The gobos work best on individuals and small groups since the closer the gobo is to the subject the more dramatic is its effect.  At least we got the lighting nailed...not quite sure who didn't read the email about clothing... :)

Try out the subtractive natural light technique and show me Your results!

Tuesday, December 16, 2014

GIVING BACK; Using Our Skills to Support Charities

As a business owner we've been involved with local charities for over 25 years.  As a professional photographer it was only natural that I join the local chapter of Lions International, since their mission is eyesight preservation.

Having been a Lion in California--the Saratoga Lions Club--for over 10-years, I checked out several chapters around Boise and joined the Meridian Lions in part because they have a growing, somewhat younger, group and they have a great fundraiser, a rodeo, that just celebrated it's 25th year.

So, after our chapter donated the major equipment to complete the Idaho Lions Vision Clinic, and the Lions Sight & Hearing Foundation announced the date of it's grand opening, I volunteered to photograph the facility and the first patient through their doors.
The Idaho Lions Sight and Hearing Foundation Lobby
I was really impressed with the custom metal wall displays.  They give the lobby a real professional corporate look.
Separate from the main lobby the vision clinic has its own entry, waiting area and the eyeglass frames wall display.

Jay Lugo, the Executive Director, meets the first patient to the vision clinic on December 12th 2014 at 9:30am.
Jay conducts the first step in the eye exam. 
The patient with our new eye exam equipment.


Some of the testing is still done the low-tech way!


Then there's the "better or worse?" Lens machine.  anyone who wears glasses is familiar with this one!

The final test before she has her eyes dilated…


After everything is done she picks out frames.  This clinic is a non-profit staffed with volunteer doctors and the Lions Clubs in the area give funds to pay for tests and glasses for those who can not afford to pay.

The facility also houses the Idaho Lions Eye Bank.  The only such bank in Idaho.  They receive, inspect, and store the donated corneas on-site, then they're shipped to needy patients on the waiting list.


Here a cornea is being inspected with a microscope outputted to a computer monitor.  The technician is actually counting how many good cells are left in the cornea.  We're born with about 4000 cells and as we age we lose them. To qualify for use in transplants they want at least 2000 cells in a cornea.  On her monitor you can see the cells in a piece of this cornea.  They also only have 14 days from extraction to examine, prepare, ship and transplant before this cornea expires as viable transplant material.


I'll end with a pretty picture at the vision clinic's front desk.  I think it's great when we can use our skill as photographers to aid in charitable good works, especially if these good causes mean something personally to us.

As always, should you have comments or questions please don't hesitate.

Till next week…

Author:  Jerry W Venz, Master Photographer Certified
Training site:  http://www.LightAtTheEdge.com

Tuesday, December 9, 2014

NATURE'S ART WITHIN WALKING DISTANCE! Part 2-Winter

Showing the transition from fall to winter is now more dramatic with our first snow fall! I start by isolating fallen leaves against the snow--in my backyard.
f8.0 @1/320 sec., ISO 200, Lens @ 200mm
I like the back light here from the low morning sun skimming over the snow creating nice detail throughout the image.

Next, I return to my favorite local trees that have stubbornly held on to their leaves…
f5.0 @ 1/800 sec., ISO 200, lens @ 200mm
I zoomed in to frame a piece of this tree just on the other side of our backyard fence with a fairly wide aperture to de-focus my neighbor's house across the street.

Moving to my front yard later in the day, I return to my favorite little tree.  This tree drops it's leaves very slowly and hangs on to it's berries well into the frigid winter.
f6.3 @ 1/800 sec., ISO 400, lens @ 105mm


I waited for the later sun to back light the tree's leaves, so the cool snow covered berries would have a warm contrasting background.


The very next morning the jet stream dropped that cold Canadian air, into our part of Idaho, creating my favorite winter condition to photograph: Freezing Fog!


Coating EVERYTHING outside with delicate ice crystals…it's like Christmas in November!  Hey, what can I say, I'm a transplanted California--I'm not used to REAL winters! I bundled-up in my warmest snow gear--it was 7º out there--and decided to use my Canon 70D again for this kind of weather.  I don't use my 5DMKII in nasty weather--it's my money-making portrait camera!

f6.3 @ 1/320 sec., ISO 400, lens @ 92mm
I went right out to my little tree to capture the snow covered berries NOW with ice crystals on the edges of everything.  Neat!
Add captf6.3 @ 1/250 sec., ISO 400, Lens @ 82mmion


One of my favorites was this cluster of leaves hanging down on the weeping willow tree next to our house.  Great Ice Crystals!


Walking to our common area a block from our house I got this nice view of the open farm area with everything dressed in ice.
 f7.1@1/1600 sec., ISO 400
I could go on and on--I've got hundreds of great images just from these two days. 

Back to my main point.  If you're in snow country, you have NO excuses, just take a walk around your house, and LOOK around! If not there, surely within a block of your home great images a wait you!

'Til next week…I'm here to answer questions so ask away…

Author:  Jerry W Venz, Master Photographer Certified
Training site:  http://www.LightAtTheEdge.com