Tuesday, December 27, 2016

WINDOW LIGHT – THE BEST LIGHT FOR WEDDINGS

Whenever possible I use window light at most weddings.  Why? It’s simply the best soft, directional (when used properly), natural looking, light we have at our disposal.  It’s infinitely preferable to flash (especially those evil speed lights) in ANY modifier.

It’s no mystery when the great classical painters like Vermeer and Caraviggio used it so much. It’s as thought the glass has some magical property that gives it’s light a soft yet directional quality that delicately wraps my subjects and still reveals details that make the portraits rich and three dimensional. That’s why I’ve sought out any window I could find on most of the weddings I’ve done these past 25 years.

The key to using window light wether your subject is a person or a product, like food or a wedding dress, is proper placement of the subject at the window. Unlike the studio, you can’t move the light source, so the lighting pattern is determined by the subject’s POSE or the angle of view as seen at the camera.
f4.0 @ 1/125th sec., ISO 400
n the image above I placed my bride close to the window (about 3-feet away) and turned her so that I got light in BOTH her eyes. I also used a soft white reflector, on camera right, just out of frame.

WINDOW LIGHT PORTRAIT GUIDELINES:
  1. Look for windows with NO direct sunlight in them. North or South facing windows are the safest.
  2. For Portraits, the window is your Light Source NOT a background! You would NEVER show the soft box in a studio portrait.  I show no physical evidence of the window—not even drapes or shears. The shears usually over expose and blow-out anyway.
  3. Keep your subject close to the window for the softest light (usually two or three feet); as you move your subject away from the window the light becomes harder and the level falls dramatically.
  4. Because window light is so soft I usually use a white reflector, for a soft fill, on the subject’s shadow side—especially if the subject if looking toward the camera.  This is to avoid split giving the face.  If I have my subject look out toward the window, creating short lighting, then I use NO reflector.
Window light is great for showing detail in most anything—that’s why commercial food photographers use it so much. So, it’s a natural for those wedding details like the wedding cake, the bride & grooms rings or any unusual details like the brides shoes…
f8.0 @ 160 sec., ISO 400
In this image I did show some of the windows because it was an overcast day limiting any blow-out and besides I HAD to put the shoes in this window box!

We always try to do a bridal dress portrait by window light. My wide is great at “posing” the dress with the brides accessories usually while the bride is having her hair and make-up done.

 f11.0 @ 1/30 sec., ISO 400
This pure window light dress portrait was posed just like I would pose the bride, except I used no reflector on the shadow side, because I wanted VERY dramatic lighting here. This image was a PPA (Professional Photographers of America) National Merit Print from one of our first digital weddings in 2002.  

As always, questions are welcome…Look forward to hearing from you!  ’Tis next week…

Author: Jerry W. Venz, PPA Master Photographer, Craftsman
Training site: http://www.LightAtTheEdge.com
Client site: http://www.TheStorytellersUsa.com

Tuesday, December 20, 2016

PHOTOGRAPHERS! SIMPLIFY YOUR COMPOSITIONS FOR IMPACT

Traditional artists know this and have the advantage of only painting (or drawing, etc.) on their canvas what THEY want us to see.  The painter can easily omit any element in a scene that hurts his composition or weakens his center-of-interest. In addition the painter decides on and creates the quality of light, its intensity, and direction EVERYWHERE in his painting.

From what I see on the internet, looking at countless websites, too any professional photographers either don’t care or don’t know how to take control of these basic aspects of their art.

Many photographers just take a “picture” of what’s in front of them (the whole thing!) regardless of the lighting and walk away.  They LOOK at the subject, but don’t SEE the many parts (often better subjects) within the whole that often tell the audience the REAL story about the subject.


Here’s an example of what I’m talking about…

f5.0 @ 1/2000 sec., ISO 125; Lens @ 70mm
Below is the over-all subject that contained the small leaf…

Over-all view 
This large backlit bush caught my attention only because of the lighting. As a whole it had little artistic merit—until I walked up to it and saw those individual ice encrusted leaves.

So, don’t just LOOK at your subjects and just trip the shutter; SEE what you can find by NARROWING YOUR VISION (use a Telephoto or Macro lens) and venture INTO the scene (you may have too get your feet wet or muddy!). And, don’t forget, SEEING is also about the light. Don’t settle for flat light; as an artist you wait for the great light or your create it.

Now go out there and SEE! ’Til next week…

Author: Jerry W. Venz, PPA Master Photographer, Craftsman
Training site:  http://www.LightAtTheEdge.com
Client site: http://www.TheStorytellersUsa.com
Tuesday, December 13, 2016

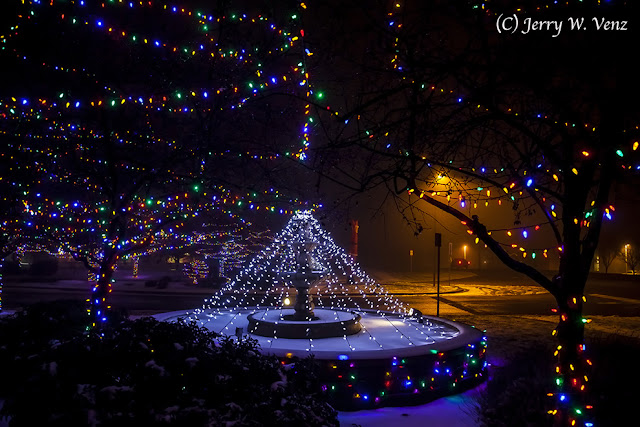
COMPOSITION MATTERS EVEN IN XMAS LIGHTS PHOTOS!

I walked around my neighborhood last night to do some Christmas lights photography.  What drew me out was the fog that developed because it has started to warm up a little; it was up to 32° F and the snow was starting to melt! Even though it was 32° F it felt really cold in the fog and my hands went numb quickly in my thin gloves.  So, I decided to not take the time to set-up a tripod and just hand hold my camera using ISO 1600. 

It took me a good 15 minutes to settle on a camera position to create the kind of compositional interest I wanted. I can’t help myself—even with something as cliche as Christmas lights—the classic compositional building blocks apply:


FOREGROUND, MID-GROUND, BACKGROUND…


f5.0 @ 1/15sec., ISO 1600, Lens @ 24mm
What immediately attracted me to this view was the street light’s glow in the background (I loved that hazy glow created by the fog.).

As is usual with my style I tend to build my images from the BACKGROUND—FORWARD. 

The fountain, as center of interest, is in the mid-ground. Then I “placed” my foreground object, that tree on the right, to fill the void on the right. 

This kind of composition is all about alignment of the various elements, which I find much easier to do when I’m not using a tripod. Even with my Canon 5D MKII I expected some noise at 1600 ISO, but the RAW files looked remarkably good and after I ran my JPGS through NICK’s DeFine 2 noise reduction they looked really nice.

Now I’m scouting some more really elaborate Christmas light displays to photograph!  

’Til next week…

Author:  Jerry W. Venz, PPA Master Photographer, Craftsman
Training site: http://www.LightAtTheEdge.com
Client site: http://www.TheStorytellersUsa.com

Tuesday, December 6, 2016

CROPPING FOR DRAMATIC IMPACT IN PHOTOGRAPHY

I do most of my portrait sessions with my 70-200mm f2.8 lens. I tend to keep as close to 200mm as I can wether I’m doing a group or an individual. If I’m only photographing an individual portrait session—especially a child—I’ll add my 1.4x extender for a telephoto compression boost.  

You see it’s not just about the telephoto compression effect, knocking the background out of focus or bokeh in the background—Things that I really do Love!—It’s about dramatic impact.  It’s about storytelling (that’s why we renamed our studio The Storytellers seven years ago.) Many times—especially with individuals—the tighter the crop the more dramatic the storytelling. 

Case in point in this session of a high school senior and her horse, I did not have enough lens at the moment of capture….
f5.6 @ 1/1250 sec., ISO 400; lens at 180mm
This marvelous moment came and went in a couple of seconds. Fortunately, I was watching their interaction through my camera’s viewfinder and I was zooming in and caught the moment as I was walking towards them. So, this post capture crop was necessary to create the drama using the composition you see.  In addition, the conversion to B&W (using Silver Efex Pro-2) helped to simplify the scene by eliminating her blue shirt.

Here’s the full-frame original color version…
Original Full Color Version
I think the crop is a huge improvement over the original, but it’s not without cost.  I believe that the single biggest disadvantage we face today with our professional digital cameras versus our medium format film cameras is our loss of image quality when we do serious cropping.

In the above images my file size went from 28mb in the full-frame version to 5mb in the cropped version! So, by my math, to end up with a file size of 28mb AFTER that much cropping I would need a starting file size of 156mb!

It was much easier in our medium format film days when we could crop and use 1/4 of a negative and still produce a great wall print.

Happy Cropping! ’Til next week…

Author: Jerry W. Venz, PPA Master Photographer, Craftsman
Training site:  http://www.LightAtTheEdge.com
Client site: http://www.TheStorytellersUsa.com

Tuesday, November 29, 2016

FALL PHOTOGRAPHY TIPS FROM A PROFESSIONAL; Part 3

This series has been about creating drama with fall colors in Different Qualities of Light. I started with direct side light using late light. Then shared my uses of backlight and how it could be used even at the “wrong time of day”. In this part I’ll show how and where I use Morning Light.

Morning light has not, in the past, been my favorite light for fall colors—until I moved to Idaho. Now, some of my favorite fall color images are in this light.  This morning light I use tends to be either on an overcast morning or if it’s clear I use the open shade—using sky light; Not Direct Sunlight. Direct morning sunlight is harsh and cool in nature and its specular high lights are too bright when behind a subject in open shade.  

That being said, fall colors using soft morning light, in open shade, can be marvelous.
Caption: f5.6 @ 1/320 sec., IO 400; lens @ 200mm
With this scene I had a morning with some thin overcast, so I still had some soft backlight that did not over power the soft front light, on the leaves, on my side of the tree.  I liked the soft nature of this light so much that in post processing I applied some negative clarity in this image to enhance the softness. 

This next image is similar, but it’s quality is different because now I’m going for crisp, sharp, detail….
 f8.0 @ 1/160 sec., ISO 800; Lens @ 150m
The lighting here is soft open shade—the tree’s canopy was blocking the sky. Because of that loss of light to get to f8.0, for good depth-of-field, I had to bump my ISO to 800.  The image is sharp, but the leaves colors are soft in this light. I really like how those leaves’ colors pop off the black bark.

One of the challenges of photographing fall leaves is that with some varieties of trees the leaves are very glossy creating highlights (when using any direct sunlight) that will blow-out (clipping). So, to avoid this fatal photography error I use only open sky (without direct sun) or overcast lighting for these glossy leaves….
f7.1 @ 1/160 sec., ISO 400; lens @ 190mm
I liked this scene only after I spotted a contrast to the sea of red leaves. That one darker leaf with its green spot became my center-of-interest. 

There you have the three qualities of light that I use for fall colors. If any photographers out there have used a different quality of light on fall colors I’d love to see your results.

‘Till next week…

Author:  Jerry W. Venz, PPA Master Photographer, Craftsman
Training site:  http://www.LightAtTheEdge.com
Client site: http://www.TheStorytellersUsa.com

Tuesday, November 22, 2016

FALL PHOTOGRAPHY TIPS FROM A PROFESSIONAL; Part 2

Last week I talked about using directional (side) lighting on fall subjects.  This week I’ll show and talk about Backlighting of fall leaves. I’ll admit it, I’m a fanatic about backlighting. I use back lighting for my backgrounds on most of my outdoor portrait sessions—regardless of the time of year. In fact if there’s no backlight giving me a nice background glow I’ll move to a different location.


So, when I’m out targeting fall color subjects what I’m stalking is backlighting. I can spot that glow from 100 yards! These leaves caught my eye about 50 years from another subject I was photographing…

f5.0 @ 1/640 sec., ISO 400; lens @ 200mm
During midday, front lighting, these leaves were dull, black, tubes of little interest. However, at the right time of day—an hour before sunset—in warm backlight these leaves became collectors of light—looking like scoops of molten steel! Using a relatively wide aperture of f5.0 to get just enough depth-of-field and my lens at 200mm I made the background fade away so these beauties could really pop.

Now how about some strong backlighting in afternoon (1:20pm) light….

f10.0 @ 1/200 sec., ISO 800 lens @ 200mm
I was pretty much done after doing some morning photography when, standing under this tree, I looked up and saw these great leaves in several colors. Zooming in to 200mm to reduce the amount of bright sky and find a nice composition this was the result.

Don’t forget to look down as well!  I zeroed-in on this detail in noon backlight…

f6.3 @ 1/1000 sec, ISO 400; lens @ 200mm
The ground was covered in leaves creating a challenge to me. What to pick? I looked for a contrast amongst the mass of leaves. What caught my eye was the shadow of the leaf behind this red leaf in the foreground. Then I moved my camera position a little to have those two background leaves backing-up my red leaf.

I Love Backlight! You can use it through-out the day if you’re careful—just don’t forget to look UP, Down—and All Around!

In part 3 I’ll talk to morning light and how I use it. ‘Till next week…

Author:  Jerry W. Venz, PPA Master Photographer, Craftsman
Training site: http://www.LightAtTheEdge.com
Client site: http://www.TheStorytellersUsa.com

Tuesday, November 15, 2016

FALL PHOTOGRAPHY TIPS FROM A PROFESSIONAL; Part 1

I’m looking for artistic drama when I do fall colors. I’ve found that the drama is in the contrasts of color and/or lighting. The lighting I look for is back-light or directional side light to pick up detail.  That means I go out in the morning, for soft Front-light, or the evening (about an hour before sunset) for Back-light or Directional (side) light.

To compositionally zero-in on the drama, whether I’m doing a relative big view or a few leaves, my lens is usually zoomed-in to 200mm and sometimes I have my 1.4x extender mounted for a little more compression effect.  In addition, I’m very careful about depth-of-field and subject sharpness in ALL of my photography. Doesn’t matter if I’m doing portraits or fine art I want my subject to be sharp and in most cases I want the background soft (controlled by shallow depth-of-field) for good separation. That being said—even though I own the superb Canon 70-200mm f2.8 lens—I never use it at f2.8 for portraits or fine art objects. The depth-of-field at f2.8 (or 3.5 and 4.0) is just too shallow, particularly when you move in close at 200mm. 

This first image, done recently, is a nice example of direct, directional, sunlight about 20 minutes before sunset.

 f6.3 @ 1/800 sec., ISO 400; lens @ 175mm
You have to be careful with front light when photographing any powerful colors to avoid chromic-clipping (blowing out detail as the colors “bloom”). That’s why we wait for the late (magic hour) light—it’s warmer and softer—which lowers the dynamic range of the scene. 

You’ll notice that my depth-of-field in this image is just enough at f6.3, to keep these two leaves sharp while knocking the entire background way out of focus.  

This next image is also side lit by the setting sun, but a different technique…

f11.0 @ 1/200 sec., ISO 400; Lens @ 192mm
This was done about 45 minutes before sunset. The focus of this image was, of course, that great fence. Since I wanted to photograph down the fence and capture that great shadow it cast on the dry grass, I put my 1.4x extender on my 70-200mm, f2.8 lens, and walked towards it to get this crop. Because I’m photographing down the length of the fence I needed lots of depth-of-field, so I went to f11.0, which gave me a shutter speed I could still hand hold.

Sad to say this old farmstead was recently sold and the developers leveled the 8-acre site—the house, barn, all the trees and this fence are all gone! :(

In the next part I’ll talk about back-lighting, then followed by using morning light.  ’Til next week…

Author:  Jerry W. Venz, PPA Master Photographer, Craftsman
Training site:  http://www.LightAtTheEdge.com
Client site: http://www.TheStorytellersUsa.com

Tuesday, November 8, 2016

SENIOR PORTRAITS WITH HORSES; PART 2

Last week I shared the pictorial—more backed-off—images from one of our senior sessions. It’s important when doing a senior session to do enough variety to not only highlight the senior’s character and interests, but to give the parents more things to choose from and ultimately purchase!

The following images are the more formal, close-up, portraits that we do on every portrait session.  We learned a long time ago that if you try to be that “pictorial artist” and only do the backed-off, full figures, showing lots of environment images in a portrait session, the clients would invariably want us to crop way-in to make “real” portraits out of them. And the subjects better be looking AT the camera and SMILING too, if you want to make a big sale!

To that end this image was a big hit…
f5.0 @ 400 sec., ISO 400; Lens @ 200mm
Even the horse is looking at the camera and “smiling”!

This was a required portrait to show her substantial involvement in the F.F.A. (Future Farmers of America), which is big here in Idaho. So, we did several set-ups with her in the blue FFA jacket. Technically this portrait was done using my favorite lighting technique outdoors.  I simply moved them back into the shade of the barn so that the open sky is the key light on them—lowering the ratio—creating a nice soft light.  Meanwhile, we have a nice background of fall colors due to the timing of the session using the setting sun.  Nice separation is created by using an aperture of f5.0, with good bokeh, mostly due to my focal length of 200mm.

Changing clothes, and horses, I went for a completely different look since it’s now only an hour before actual sunset and the light is warming up…
f4.5 @ 1/2500 sec., ISO 400, Lens @ 200mm
I don’t usually put my portrait subjects in direct sunlight; the most notable exception is sunset at the beach—not so much now that we are here in Idaho! In this case I had a young lady with perfect skin and I wanted DRAMATIC lighting so why not?

Finally to show-off another of her interests she literally changed hats and got out her guitar.  Mom suggested she hop on the hood of their old pick-up truck and we resumed in the right of the setting sun.
 f5.0 @ 1/1600 sec., ISO 400; lens @ 168mm
I’m back on my ladder for these since I did not want to shoot UP her nose (or her dress!); this kept my camera at her eye level.  In addition the black and White adds a different look to the session.

As usual, should you have questions don’t hesitate to ask, comments are also welcome. ’Til next week…

Author:  Jerry W. Venz, PPA Master Photographer, Craftsman
Training site:  http://www.LightAtTheEdge.com
Client site: http://www.TheStorytellersUsa.com

Tuesday, November 1, 2016

SENIOR PORTRAITS WITH HORSES; PART 1

Planning and preparation are important in any portrait session, but when we do an outdoor session the most important aspect is Not compromising on lighting. I want perfect natural light with backlighting to bring out the colors-especially in the fall.

Part of the planning was scouting a new location (Eagle Island State Park here in Eagle, ID) where we could take people with their horses and have parking nearby. We have had avid horse enthusiasts suggest these “great locations” only to find that you could only access them with a horse miles into the back country! Since we don’t have horses we need our location to be accessible at least by 4x4 to bring in our camera gear (and back-ups), gobos, scrims, tripod and at least one ladder. 

We had already cancelled this gals photo session TWICE because of fully overcast sky (remember NO compromise!). I will not do an outdoor portrait session under an overcast sky as that kind of gray day just mutes all the colors—you have NO backlight—so you get no separation between the subject and the background. In addition the overcast sky creates a top light that promotes “raccoon eyes” giving people dark eye sockets. I want my backgrounds to be ALIVE with color—overcast sky creates DEAD backgrounds.

This session was going to be challenging since this gal was bringing TWO horses and wanted to do three or four clothes changes. She needed some official images done in her FFA (Future Farmers of America) clothes, showing the logos followed by casual clothes and then individuals without her horses.

This first image shows why I don’t compromise on the lighting…
f5.0 @ 1/400 sec., ISO 400 Lens @ 200mm
Here we have terrific directional rim lighting on both horses while we have soft sky light on her face, because the horse behind her is acting as my gobo—blocking the direct sunlight that was hitting her face on one side.

I must add that the reason these horses look so good (aside from the lighting) is that their ears are perfectly erect—a must have in equine portraits—due to the experienced assistance of this young lady’s mother and sister who were always behind me with their noise makers (like the effective rocks in a box) when I needed the horses at attention!

Close in photos are great, but I always want a master pictorial or scenic image that is more appropriate as a large wall portrait when we do horse sessions. Our goal is to put photographic prints on people’s walls that can be viewed as art.

f8.0 @ 1/1000 sec., ISO 400; lens @ 125mm
Directional light, fall colors, that old leaning out building and all the subjects looking in the same direction—it’s a miracle! No, mom and sister were doing their thing with those noise makers! 

I always try for some images of people walking their steeds as well…

f5.0 @ 1/400 sec., ISO 400; lens @ 200mm
In Part 2 I’ll show her closer-up individual portraits with clothes changes…

’Til next week…

Author:  Jerry W. Venz, PPA Master Photographer, Craftsman
Training site: http://www.LightAtTheEdge.com
Client site: http://www.TheStorytellersUsa.com

Tuesday, October 25, 2016

PORTRAIT OF A BLACK LAB OUTSIDE

Here in Idaho we do a lot of portraits ( www.TheStorytellersUsa.com ) of people with their animals.  By far the most technically difficult are black horses, dogs and cats WITH their owners—especially if their humans are fair conplextionecd caucasians.  The issue then is lighting for the wide dynamic range of the white skin versus the jet black of the animal.

How do we as professionals handle this?  It’s no different than our film days. We place our subjects in open shade one or two hours before sunset, which brings the light levels in the background down to a recordable level.  Exposure is measured with a hand-held INCIDENT Light Meter—thus measuring only the light falling ON our subject (not what’s in the background).

Your camera’s meter is a reflectance meter that sees your subject (the incident meter dos not see the subject—only the light falling on it), and its designed to average the world to 18% gray. So, if you “zero” the meter on white snow or a black lab it will render both as gray. 


These methods takes care of exposure and dynamic range at the same time…

f5.0 @ 1/160 sec., ISO 800; lens @ 135mm
The background has some nice colors—even some bokeh with the aperture at f5.0 — and the dog has great detail through out.

Using these techniques, with the dog’s humans in place, creates the balance necessary for our digital camera to record this much dynamic range…

f6.3 @ 1/200 sec,m ISO 400; Lens @ 200mm
Some photographers may say why not photograph the dog in direct sunlight to really show it’s detail? I have done that on occasion—but, I would Never put people in such harsh light!

So, let’s compare direct sunlight with open shade on this black lab…

f5.6 @ 1/400 sec., ISO 400
With direct sunlight we have the dogs shinny black coat creating a lot of specular high lights—and that alone can play havoc with many digital camera’s ability to record those highlights without clipping. (My Canon 5D MKII did handled it well). However, my biggest complaint here is with the dog and background in the same hard light there is little separation of the dog with it’s background; the dog is merging into the background. In addition the dog is actually squinting it’s eyes in the harsh light.  

Now compare it with open shade…
f5.0 @ 1/160 sec., ISO 800
The dog looks more relaxed; it’s eyes are open wide.  There’s nice detail without all the specular highlights and we have dramatic separation of the dog and the background because of the DIFFERENT light sources.

Ask your questions or leave a comment…’Til next week…

Author: Jerry W. Venz, PPA Master Photographer, Craftsman
Training site:  http://www.LightAtTheEdge.com
Client site: http://www.TheStorytellersUsa.com

Tuesday, October 18, 2016

JAPANESE TRADITIONAL BRIDAL PORTRAITS - PART 2

This portrait session was done at the Japanese Hakone Gardens in Saratoga, California during their annual Matsuri where I was their official photographer. 

In Part 1 I showed some images of the bride in the traditional all white outfit with the head shroud—which symbolically covers her head to hide the “Horns of Jealousy”. In this part she has changed into the very colorful reception outfit and removed the head shroud.  

During the Matsuri there are traditional Japanese musicians, dancers and artists who combine their talents to recreate the look and feel of Japanese culture centuries old—well aided by the authentic Hakone Gardens ambience.

One of my favorite events was the work by a Japanese performance artist that set-up two very large canvases (each 10 feet x 20 feet) and then painted them using brooms to the accompaniment of traditional music. Then while the paint was still wet he would toss or blow colored powders from his hands to accent the black Japanese calligraphy. Of course, as soon as he was done I HAD to get my bride in front of these perfect backgrounds for yet another look to her portraits.

One of my favorites…

 f4.0 @ 1/400 sec., ISO 400; lens @ 200mm
With the Hakone pond in-between us, my lens at 200mm, I used hand signals to position her where I wanted her to stand, position of her shoulders and where to look.  At least with the pond between us none of the many amateur photographers in attendance could step in front of my camera! 

Close ups of the bride Not Looking at the Camera are one of my required portraits…

 f5.6 @ 1/800 sec., ISO 800; lens @ 200mm
Creating some nice Bokeh in the background; with my lens at 200mm the f-stop does not matter so much. Just like all weddings, I show the details of her ensemble…

f4.5 @ 1/1000 sec., ISO 800; lens @ 200mm
As I said in Part 1, moving the bride around the gardens for different looks (with a variety of backgrounds) is always my goal when I’m outside.  However, using only natural light when your subject is some distance from your camera position requires careful placement of the subject.  One of my basic rules is to not allow direct sunlight to strike my subject’s face (actual sunset light is the exception). Since we were doing these portraits between 3 and 4pm in May the light was high and harsh, so, I kept the sun behind her creating a powerful rim light…

f4.5 @ 1/500 sec., ISO 400; Lens @ 200mm
You can see why traditional ethnic weddings are so much fun (and my favorite of all weddings). Their color and details are a joy to photograph and they enable to the photographer, with an artistic eye, to create a truly unique portfolio that will WOW both clients and prospective clients.

As always, have a question don’t hesitate to ask…’Til next week…

Author:  Jerry W. Venz, PPA Master Photographer, Craftsman, Certified
Training site:  http:www.LightAtTheEdge.com
Client site: http:www.TheStorytellersUsa.com

Tuesday, October 11, 2016

JAPANESE TRADITIONAL BRIDAL PORTRAITS - PART 1

Whenever I’m outside the studio ( http://www.TheStorytellersUsa.com ) doing portraits on a location with good indoor and outdoor spots for photography two criteria are always the most important to me…

1)  Using Natural Light Everywhere.

2)  Working the location—moving my subject around during the session using as many of the different backgrounds that the location has to offer.

This portrait session was done at the Japanese Hakone Gardens in Saratoga, California during their biggest event of the year—their Matsuri—where I was their official photographer. This actual bride to be was there to demonstrate the look of a traditional Japanese bride. Because of all the other events I had to cover I only had an hour with her and to complicate things there were hundreds of spectators and what felt like hundreds of amateur photographers following us around the gardens getting in my way!  In addition, because there was a pond in the middle of the garden that often separated us I had to communicate with her via had signals (I had NO assistant on this session) to tell her where to stand, which way to face in a pose and where to move to for the next set-up.  Yelling didn’t work due to the constant music and PA announcements during the event.  Fortunately, she took direction well and we got a nice variety of images…

 f4.0 @ 1/800 sec., ISO 400; lens at 200mm
One of my favorite close-ups; I used Silver Efect Pro 2 to Sepia tone and enhance grain in this image.  I had fun working the the “hood” on her white outfit—it could be a scrim as in the last image or a gobo (blocking light) in the following image…

f5.6 @ 1/800 sec., ISO 800; Lens @ 200mm
Sometimes you don’t have to show the whole face in a portrait—I like her little smile and eye lashes! And, to make this image more interesting I zoomed in to 200mm to create some nice Bokeh in the background. 

Note:  I found the bokeh FIRST then I placed her exactly where I wanted her to be to have the bokeh where I wanted it!

We went inside the cultural center because I found a great background with warm incandescent light and placed her near the open door to photograph her by natural light of course!

 f3.5 @ 1/160 sec., ISO 800; Lens @ 80mm
The open door acted like a large window and created a nice contrast to the warm background lights. Because of these mixed color temperatures I did a custom white balance on just the light falling on her.  Natural light is not only the best light it’s easy to control!

I’ll continue with this really fun session in Part 2 next week. ’Til then…

Author:  Jerry W. Venz, PPA Master Photographer, Craftsman, Certified
Training site:  http://www.LightAtTheEdge.com
Client site: http://www.TheStorytellersUsa.com

Tuesday, October 4, 2016

SIMPLIFY YOUR FALL COLORS PHOTOGRAPHY

This time of year I see thousands of fall color images that are usually just record shots of a tree that has changed colors or worse a forrest of colorful trees. I think that the more a photographer shows of a given subject the less he has to say about it. The amateur photographer by taking a picture of a pretty forrest asks nothing of the viewer and often says nothing to the viewer about the scene.

As a professional photographic artist I prefer to narrow my view on most subjects and look for the unique details within a scene. I don’t do forrest and rarely photograph a whole single tree. I find far more interesting compositions when I move into the forrest and then I narrow my view further by using my telephoto lens to zero-in on special details….


 f8.0 @ 1/160sec., ISO 800 Lens @ 150mm
I like the first two weeks of October, so that I can get more of a range of colors—some leaves are still green while others are yellow to blazing red.

I like this image because the leaves really show well against the tree’s black bark. When walking under a tree’s canopy I like to look up for back lit leaves…

f6.3 @ 1320 sec., ISO 800 Lens @ 85mm
Here again, I have a nice color contrast between the orange/yellow leaves and all the green leaves higher up in the canopy.  And then sometimes the story can come down to one solitary leaf on the ground…

f8.0 @ 1/250 sec., ISO 400 Lens @ 200mm
Taken at sunset towards the end of October, this image is truly symbolic of fall. So, I urge those beginning photographers that want to hone their compositional skills to narrow your view (replace that wide angle with a telephoto zoom lens) and get INTO the forrest; Look for the Details!

I tell my students, “You can often show more by revealing less.”  HAVE FUN!

Author:  Jerry W. Venz, PPA Master Photographer, Craftsman, Certified
Training site:  http://www.LightAtTheEdge.com
Client site: http://www.TheStorytellersUsa.com

Tuesday, September 27, 2016

EQUESTRIAN PHOTOGRAPHY ON THE BEACH

This session was part of an engagement session for an upcoming wedding. My vision for this final image was of the couple galloping side by side, on their respective courses in the surf.  Well the best laid plans are easily shot-down by the unpredictable nature of horses! It turned out that the horse he borrowed (big mistake) was terrified of the surf—and sat on it’s tail, did a 180 and ran the other way as soon as it’s hooves touched the water!

So, we were down to her and her horse, which greatly simplified the execution and composition of this image.

My experience doing portraits of people while mounted atop their horses taught me that my camera position needed to be at least as high as the chest of the rider.

One of the basic rules of portraiture is that you don’t want to be “shooting” up people’s noses! Therefore, I’m usually on the 6-foot ladder when we are all on level ground. One of the important compositional side benefits is with my high position I can often place the rider’s head below the horizon line creating a better background.

So, to prepare the this session I made a ladder platform (so my ladder would not sink into the dry sand) using a three foot square piece of plywood, screwed some handles on it, and used my 3-foot ladder since I planned to be on the elevated sand away from the surf.

This accomplished two things: 

1) My high angle down eliminated the sky, which would have just blown-out anyway.
2) This backed me off enough to use the 180mm lens on my Mamiya RB-67, so I could compress the scene, crop in camera, and make the pan easier.  Yes, I’m hand holding my RB-67 with a 180mm lens and bellows lens shade!


So here was the result…

f5.6 @ 1/500 sec., ISO 800 (Fuji NHG film)
I had her ride the horse in a big circle around me coming to a full gallop only in the surf.  We did that six times, so, I only made One Exposure each time they galloped by—those of you familiar with the Mamiya RB-67 know why!  The one thing I did not count on was the how much the ground would shake when they rode my me….Wow what an experience on top the ladder!  The rest of the session went well, they loved the images and their wedding was great too. 

The icing on the cake was my print of this image, when entered into PPA’s International Print Competition (1996) was chosen for their traveling loan collection—the highest award PPA bestows on an individual print.

As usual questions are welcome….’til next week.

Author:  Jerry W. Venz, PPA Master Photographer, Craftsman, Certified
Training site: http://www.LightAtTheEdge.com
Client site: http://www.TheStorytellersUsa.com

Tuesday, September 20, 2016

WHAT WAS MY LIGHTING TECHNIQUE IN THIS IMAGE? THE ANSWER

When we as professional portrait photographers look at a portrait we look to the eyes of the subject and the shadow pattern (if any) on the mask of the face to determine how the subject was lit.

As for the eyes I look for the position of the catch lights and the size and shape as well.  The catch lights should not be dead center in the pupils and ideally they should be large and round—not square or rectangular (outside the studio) or worse yet hard-pinpoints (I call these Ice-Pick catchlights) most generally caused by speed lights. 

Outside the studio we should make our lighting look as natural as possible.  Centered catch lights meaning the key light is coming mainly from the front just washes out any shadows creating flat lighting. Without shadows you loose three dimensionality in your subject.

So, in my example portrait I first placed my subject in a spot that had nice back light for separation and visual interest. In addition, I have her placed near a large rock surrounded by trees just out of frame to camera left. The rock and trees are acting as Gobos—blocking light and creating a nice shadow on the left side of her face.  This is called negative fill or subtractive lighting.

The key light is a large patch of open blue sky creating a nice soft, yet directional, lighting pattern on her face. 
F4.5 @ 1/160 sec., ISO 400, lens @ 200mm
I typically use f4.5 to get the entire face sharp, yet still blur out the background nicely because my lens is at 200mm.

It’s that simple!!  Feel free ask me anything about this type of lighting.

Author:  Jerry W. Venz, PPA Master Photographer, Craftsman, Certified
Training site:  http://www.LightAtTheEdge.com
Client site: http://www.TheStorytellersUsa.com

Tuesday, September 13, 2016

WHAT WAS MY LIGHTING TECHNIQUE IN THIS IMAGE? DO YOU KNOW?

Looking at other photographer’s portraits and deducing how the lighting was done can be very educational and it’s fun too!

If you’re a beginning portrait photographer it’s a great way to challenge your ability to see light direction and evaluate shadow and lens technique as well.  

As a PPA (Professional Photographers of America) Certified, Master, Craftsman with over 30 years experience doing portraits ( http://www.TheStorytellersUsa.com ) it’s my hobby to check out other PPA photographer’s web sites, evaluate their portfolios, and offer them constructive critiques of their portraits.

Since I’ve been judging professional print competitions for decades, this comes naturally to me and I really enjoy helping other photographers improve their craft.

So, please give me your take on this portrait I did recently of this high school senior.  

How did I light her?

What focal length lens do you think I used?


What f-stop do you think I used?


Look forward to hearing from you this week.  Next week I will give you all the details on this image and you can check on how well you did.

Author:  Jerry W. Venz, PPA Master Photographer, Craftsman, Certified
Training site:  http://www.LightAtTheEdge.com

Tuesday, September 6, 2016

HOT AIR BALLOON PHOTOGRAPHY

We just had our 25th Annual Spirit of Boise Balloon Classic and as usual I had a blast photographing this very challenging event.  My approach as a professional photographer is very different than most amateurs (or other pros) from the results I see posted on the web.  It seems that most photographers either try to cram as many balloons, into each frame they expose, as they can or they do a solitary balloon dead center in a frame. In either case there is no composition; the former is chaos and the latter is static and boring.


When I photograph hot-air balloons my goal is to filter out the chaos with composition—I narrow my view looking for alignments of these colorful subjects into compositional layers.  One of the compositional rules I employ is the classic foreground, mid-ground, and background. Using this technique with hot-air balloons is very challenging especially when some 40+ balloons are launching all at once, all around you! So, what I do is narrow my view to include fewer balloons and create layers of balloons by changing my position constantly as the balloons change their positions…such as this:

 f6.3 @ 1/500 sec., ISO 800
This image has Four Layers: A foreground balloon, a mid-ground balloon, a background balloon and a cloud filled sky. 

In addition there’s beautiful directional lighting because of the balloons I choose and where I choose to stand. You see in addition to all this compositional stuff I also want the best lighting I can get as well!  Whenever I can I want the sunrise light to skim across the surfaces of my balloons—creating shadows and three-dimensionality. If I see a balloon scene coming together that’s got all front light (flat light) I’ll quickly move 90 degrees to get the side light I’m talking about; no easy feat with the size of my subjects and all the other spectators and photographers on the field at the same time!

When I do photography of a single balloon I usually don’t show the whole balloon to avoid a static composition.  In the example below I zoomed  in…

f6.3 @ 1/500 sec., ISO 800
By cropping the balloon in camera I cut out the darker, top portion, of the balloon to showcase what caught my eye—that great directional light skimming across the bottom of the balloon and the backlight creating a nice glow above the basket. In addition by off-setting the balloon I created some compositional negative space in the bottom of the frame.

One of my favorite aspects of hot-air balloons is the fire!  Again, I’m looking for some layers in these images as well.  Even in a vertical composition such as this next image I managed to get multiple balloons in the frame with my main subject…

f6.3 @ 1/320 sec., ISO 800
Another image I like to create is a close in portrait of the people in the balloon’s basket—making it appear that the image was shot in the air (balloon to balloon). This requires a telephoto (at least 200mm), which puts distance between you and the balloon so that the angle of view does not appear to be shooting UP at the balloon.  Like this…

 f5.0 @ 1/640 sec., ISO 800; Lens @ 200mm
When I do this I want the basket of my subject balloon to be layered against another balloon to create an interesting background. It’s not easy since all these balloons are in motion it may only take 15 or 20 seconds for the front balloon to make it’s transit across the back balloon.  

I can’t wait ’till next year’s Boise Balloon Classic!

Don’t hesitate to ask questions…’Til next week…

Author:  Jerry W. Venz, PPA Master Photographer, Craftsman, Certified
Training site:  http://www.LightAtTheEdge.com
Client site: http://www.TheStorytellersUsa.com

Tuesday, August 30, 2016

OUTDOOR NATURAL LIGHT AND CAMERA POSITION

It does not matter what my subject is: portraits of people, animals, cars, hot air balloons; when outside natural light—at the right time of day—can’t be beat. And when doing fine-art images of things outside, particularly if I’m using the direct sun as my key light, it’s vital that I use either sunrise or the last couple hours before sunset as my start time.

Most photographers get that; I hear constant agreement that the “Magic Hour” is the best time of day for outdoor photography.  But, all too often I still see images done at the magic hour that are done in broad light (flat light) lacking texture and detail because there are no shadows. What’s the point of going out at the magic hour if you’re not going to create some magic with that great light!

What these photographers are missing from the equation is Camera Position. I tell my students, “If there are no shadows you’re out at the wrong time of day and/or you’re in the wrong spot.” It’s real easy figuring the right time of day—just go online to a weather site or almanac for your location—nothing to it. But, for camera position relative to your subject you must look for and see the light’s effect on your subject. I guess a lot of photographers out there have vision but don’t see the light.

So, what I do when I arrive on my location, typically about 2 hours before sunset, I pre-scout all the subjects I have before me for their position relative to the setting sun. If the sun isn’t skimming across my subject from one side or the other then I move my camera position so that it is.

This is what I’m looking for…

f9.0 @ 1/250 sec. ISO 400
Dramatic lighting like this is ideal for black-and-white work where it’s essential to have good blacks. Theses images were done at a local tractor salvage yard. There were rows of these great, rusting, old, tractors and their parts on this two acre site. Most of my favorite images were done inside the last hour of light.

 f16.0 @ 1/125 sec., ISO 400
I kept this one color for those great reds and the rusted wheel.  

This next one was one of my favorite tractors…

 f11.0 @ 1/160 sec., ISO 400
I love this old, beat-up, tractor! The lighting actually looked good facing its front as the sun was crossing its front surface nicely, but I found it even more dramatic moving my camera position to the tractor’s shadow side. This position gave me a hard skimming/back-light that created what we call “short-lighting” on the tractor.

Short lighting is one of my favorite lighting patterns when doing portraits of people—very dramatic.

’Til next week…have questions don’t hesitate to ask…

Author:  Jerry W. Venz, PPA Master Photographer, Craftsman, Certified
Training site:  http://www.LightAtTheEdge.com
Client site: http://www.TheStorytellersUSA.com
Fine Art site: http://www.TheMithrilCanvas.com